
November 10th, 2020 by admin
The use of video conferencing services such as Pexip, StarLeaf, Webex and Zoom have exploded for doctor-patient sessions during the Covid-19 pandemic.
Based on patient consent, many healthcare providers choose record these telehealth session for one or more of the following reasons:
- Regulatory compliance
- Quality assurance and training
- Documentation of good practise
The Health Insurance Portability and Accountability Act (HIPAA) is a US federal law that protects the privacy of personal health information. It is the responsibility of the healthcare provider to ensure that a HIPAA compliant solution is used, both for telehealth sessions as well as for the solution used for recording of doctor-patient sessions.
The REC.VC cloud service is HIPAA compliant for recording of telehealth sessions on most video conferencing platforms including Pexip, StarLeaf, Webex and Zoom.
The REC.VC HIPAA Edition includes the following:
- Use of the REC.VC fully redundant data centers in Ashburn, VA, with Equinix
- Customer branded portal and domain
- Single Sign-On (SSO) for any user within an organization*
- Automatic provisioning of new user accounts based on SSO
- Optional automatic secure (S)FTP(S) export (for organizations wanting the recordings to be stored on premise and not with the REC.VC cloud service
- Encrypted communication with third-party video conferencing services
- Encrypted recordings (at rest)
- Business Associate Agreement (BAA) signed with the Covered Entity
* SSO is based on REC.VC’s support for SAML 2.0 which enables integration with any SAML 2.0 supported authentication source.
Please contact sales@rec.vc for any questions regarding the REC.VC HIPAA edition.
New to REC.VC? Sign up for a 14 day free trial today!
Looking for a HIPAA compliant video platform?
Secure video conferencing for telehealth has never been easier—by.Video offers end-to-end encrypted sessions with built-in privacy safeguards tailored for healthcare providers.
Posted in Recording Tagged with: cisco webex, hipaa, pexip, starleaf, telehealth, zoom

October 14th, 2020 by admin
Here is a guide to how you can use REC.VC to record a meeting on Google Meet.
Prerequisites
You’ll need the following to record a meeting on Google Meet using REC.VC:
We will in this guide cover how to use REC.VC with Pexip CVI as a Service to record a Google Meet. Note: The process is very similar for Pexip Infinity.
Google Meet enabled with support for third-party SIP endpoints/clients
The combination of Google Meet and Pexip CVI ensure that your SIP endpoints (Cisco, Polycom, Lifesize, etc) can call into a meeting on Google Meet.
In this context, REC.VC is simply another (virtual) SIP endpoint which you can instruct to call into a Google Meet for the purpose of capturing video, audio and any content shared in Google Meet.
How to record a Google Meet, step by step
1. Obtain the SIP address for the Google Meet
You can obtain the unique meeting SIP address for a Google meet in the following ways:
For scheduled meetings, unique meeting SIP address can be obtained by clicking on More joining options in the Calendar invite (for scheduled meetings) or by clicking on More numbers and room options while the meeting is in progress.
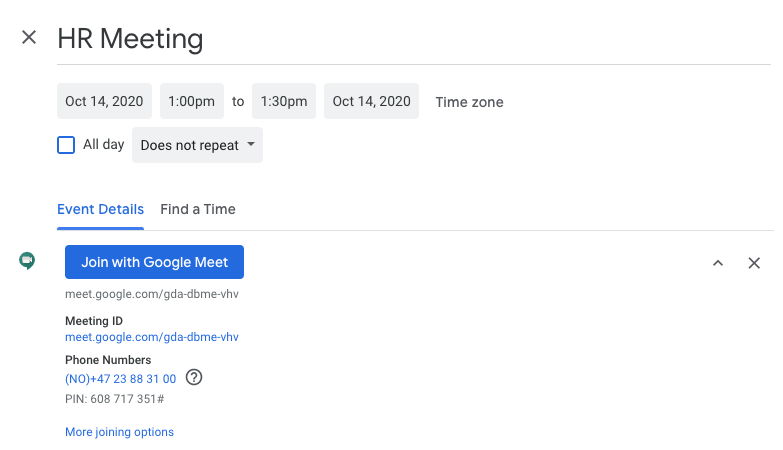 Calendar invite: Click on joining options
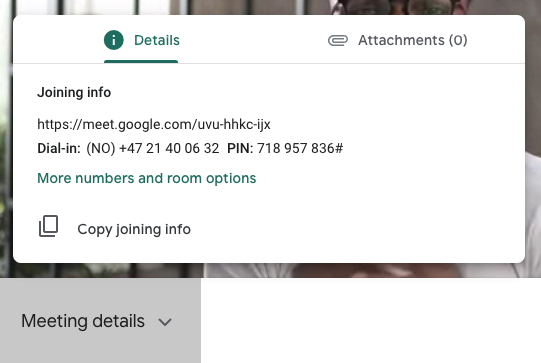 Meeting in progress: Click on More numbers and room options
When clicking on the link (before or during the meeting), you’ll get to a Google Meet page with two tabs: Dial-in numbers and Third-party systems. The unique meeting SIP address is listed under Third-party systems and has the following structure:
<unique-meeting-id>@gmeet.pexip.me
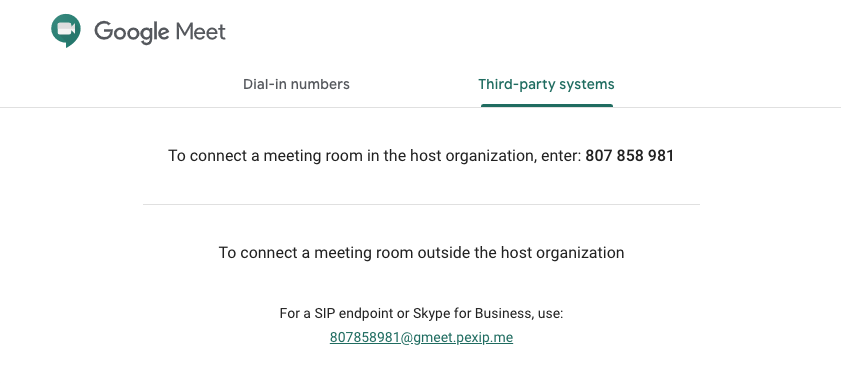 The unique meeting SIP address is listed under Third-party systems
2. Start recording the Google Meet
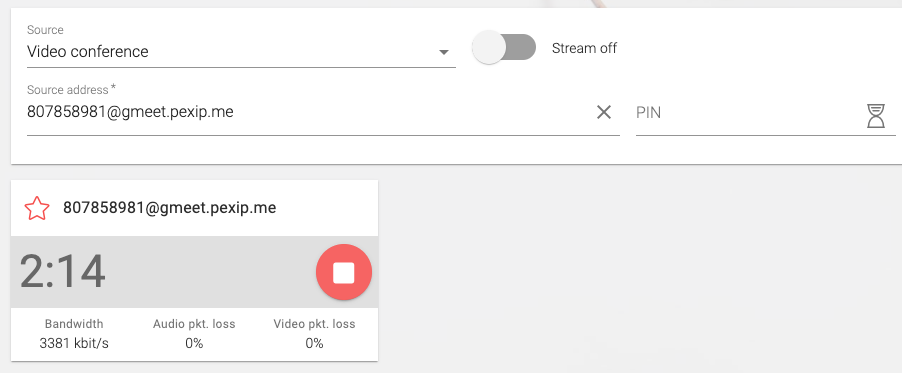
To start recording, access your REC.VC account and copy & paste the unique meeting SIP address (from step 1) to into the Source address field and click on the red RECORD button:
 REC.VC user interface: Add the unique meeting SIP address and click RECORD
REC.VC will then place a SIP call to the unique meeting address of the Google Meet. In the Google Meet user interface, you’ll be notified that your REC.VC recorder wants to join the meeting. REC.VC starts recording audio, video and content as soon as you Admit the recorder into Google Meet.
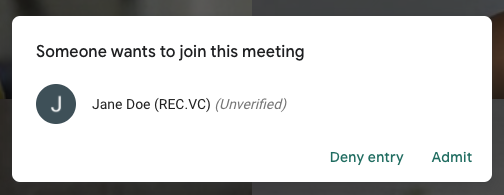 Google Meet user interface: Click on Admit to let REC.VC record the meeting
3. Stop recording the Google Meet
Whenever you want to stop recording, you can disconnect the REC.VC recorder in the Google Meet user interface by clicking on Remove from meeting, or click on the STOP button in the REC.VC user interface
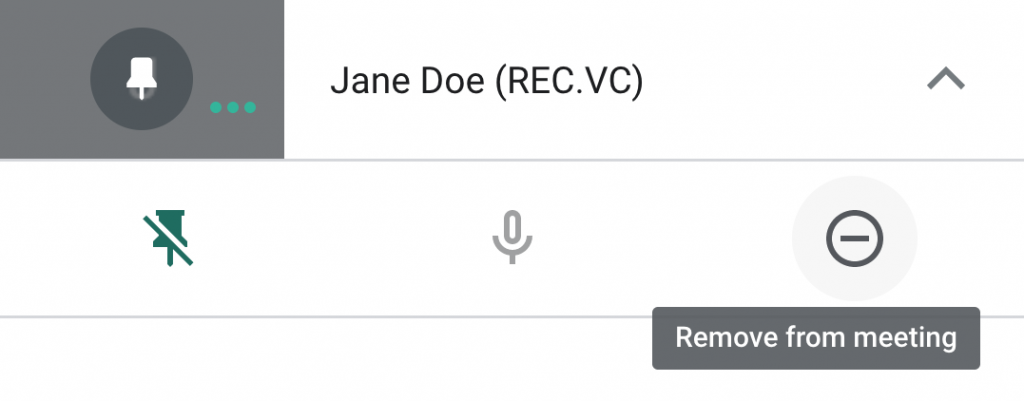 Google Meet user interface: Stop recording by removing recorder from meeting
4. Managing and sharing your recorded Google Meet meetings
The video tutorial below shows how you can manage, share, trim and delete your Google Meet recordings.
Posted in Uncategorized Tagged with: cvi, google meet, pexip, record meeting, recording

August 13th, 2020 by admin
REC.VC makes it easy for anyone to record & share their Pexip meetings in a secure and effective way, increasing the value of the meeting itself.
We are in this blog post covering how you can record a Pexip meeting based on the following Pexip options:
- Pexip as-a-Service (Pexip’s cloud service)
- Pexip Infinity (software deployed by your organization or service provider)
Prerequisites
1. Recording a meeting on Pexip as-a-Service
You can record a meeting by initiating the recording from the Pexip user interface side or by doing it via the REC.VC user interface.
REC.VC supports both SIP and RTMP recording when it is initiated via the Pexip user interface. When the recording is initiated via the REC.VC user interface, only SIP recording is applicable.
1.1 Recording via the Pexip as-a-Service interface (using SIP or RTMP)
1.1.1 SIP based recording
You can call out from your Pexip VMR just like you would call out to any SIP based video conferencing endpoint, here are the steps:
Step 1: Click on Show participants

Step 2: Click on Invite someone

Step 3: Enter the SIP URI (video address) of your REC.VC recorder, typically your.name@rec.vc (the actual address is listed at the top of the REC.VC user interface) and then click on the + button.

Step 4: To start recording, click on the green Dial button

Pexip dials out to your REC.VC recorder which joins as a regular participant and captures any video and audio, and any content shared in your meeting.
1.1.2 RTMP based recording
Step 1: Click on Show participants

Step 2: Click on Stream/record now

Step 3: Copy and paste your REC.VC RTMP(S) URL (available in the REC.VC user interface when Source is set to RTMP(S)) into the “Server or stream URL” field in the Pexip user interface (no need to fill in the other fields).

Step 4: Click on the “Start stream now” button
Pexip sends the RTMP feed containing video and audio, and any content shared, to your REC.VC RTMP recorder. The recording will be in the same resolution (720p, 1080p, etc) as received from Pexip.
1.2 Recording via the REC.VC interface (using SIP)
An alternative way for SIP based recording is to initiate the call between Pexip and REC.VC from the REC.VC side. Here are the steps:
Step 1: Access your REC.VC account (my.rec.vc)

Step 2: Enter the SIP URI of your Pexip VMR (typically something like your.name@pexip.me) and enter the PIN code for your VMR if it is PIN code protected, and hit the RECORD button.

REC.VC dials out to the Pexip VMR and captures video and audio, and any content shared during the meeting.
2. Recording a meeting on Pexip Infinity
Similarly to Pexip as-a-Service, recording a meeting on Pexip Infinity can be initiated on the Pexip side (SIP or RTMP recording) or on the REC.VC side (SIP recording).
2.1 Recording via the Pexip Infinity interface (using SIP or RTMP)
Pexip Infinity offers two user interfaces, webapp1 (legacy) and webapp2 (the latest). We will here cover both user interfaces in terms of how you can record a meeting using either interface. Please note that both user interfaces are highly customizable and that the steps below are based on the out-of-the-box versions.
2.1.1 SIP based recording (webapp1)
Step 1: Click on Add a new Participant

Step 2: Enter the SIP URI (video address) of your REC.VC recorder, typically your.name@rec.vc (the actual address is listed at the top of the REC.VC user interface) and click OK.

2.1.2 RTMP based recording (webapp1)
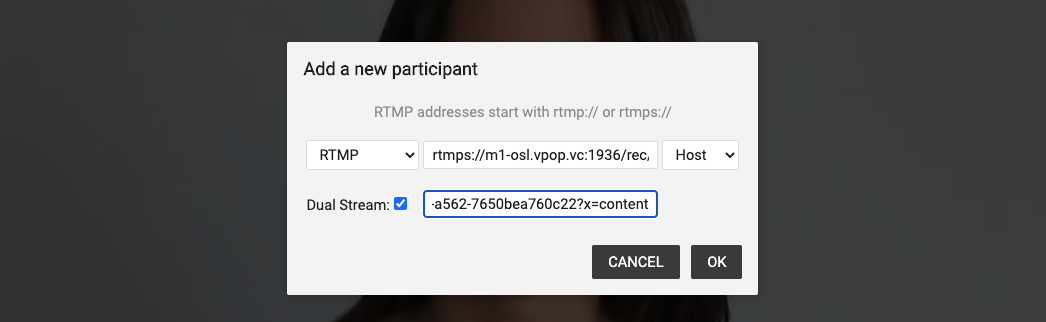
Step 1: Click on Add a new Participant

Step 2: Copy and paste your REC.VC RTMP(S) URL (available in the REC.VC user interface when Source is set to RTMP(S)) into the RTMP address field in the Pexip user interface

Pexip sends the RTMP feed containing video and audio, and any content shared, to your REC.VC RTMP recorder. The recording will be in the same resolution (720p, 1080p, etc) as received from Pexip.
Optionally, if you want to record video & audio, and content as two separate recordings, you can check the Dual Stream option and copy paste your REC.VC RTMP(S) URL to the second RTMP field. Please note that as Pexip requires the RTMP(S) URLs to be unique, you’ll need to add a random variable at the end of your REC.VC RTMP(S) URL (in our example below we have added “?x=content”).
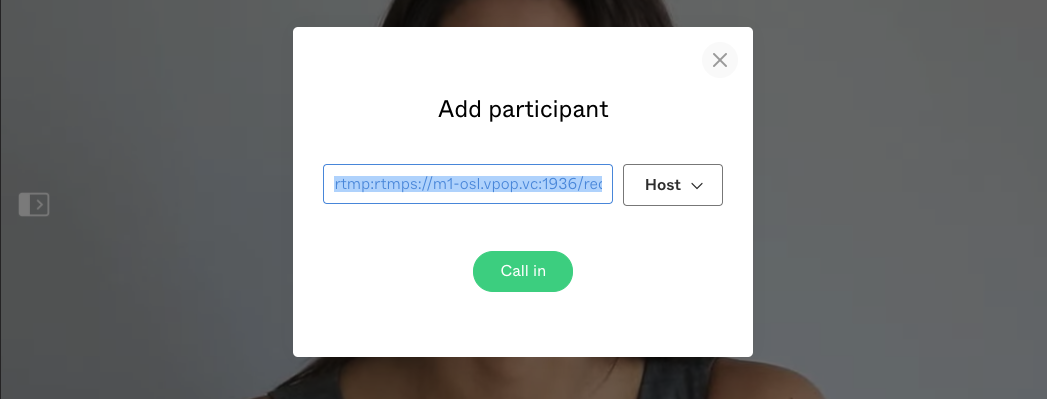
2.1.3 SIP based recording (webapp2)
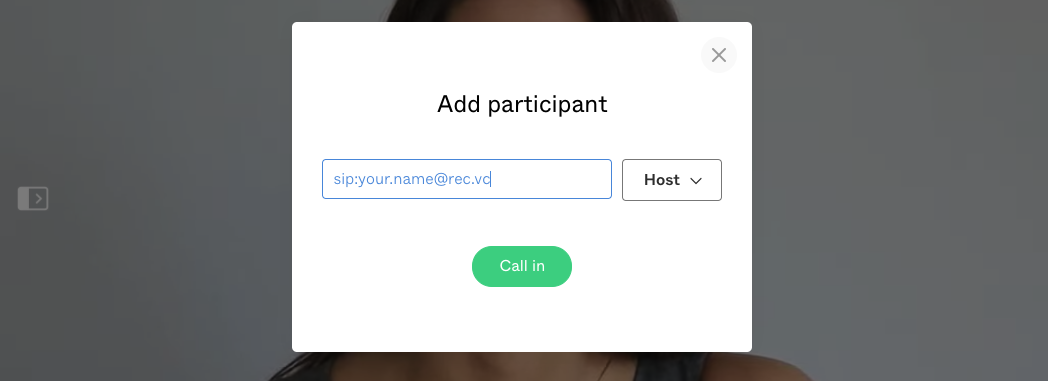
Step 1: Click on Add participant

Step 2: Enter the SIP URI (video address) of your REC.VC recorder, typically your.name@rec.vc (the actual address is listed at the top of the REC.VC user interface) and click Call in. Please note that you need to specify “sip:” at the beginning of the SIP URI.
Pexip dials out to your REC.VC recorder which joins as a regular participant and captures any video and audio, and any content shared in your meeting.
2.1.4 RTMP based recording (webapp2)
Step 1: Click on Add participant

Step 2: Copy and paste your REC.VC RTMP(S) URL (available in the REC.VC user interface when Source is set to RTMP(S)) into the address field in the Pexip user interface and click Call in. Please note that you need to specify “rtmp:” at the beginning of the REC.VC RTMP(S) URL.
Pexip sends the RTMP feed containing video and audio, and any content shared, to your REC.VC RTMP recorder. The recording will be in the same resolution (720p, 1080p, etc) as received from Pexip.
2.2 Recording via the REC.VC interface (using SIP)
An alternative way for SIP based recording is to initiate the call between Pexip and REC.VC from the REC.VC side. Here are the steps:
Step 1: Access your REC.VC account (my.rec.vc)
Step 2: Enter the SIP URI of your Pexip VMR (typically something like your.name@vmr.yourdomain.com) and enter the PIN code for your VMR if it is PIN code protected, and hit the RECORD button.
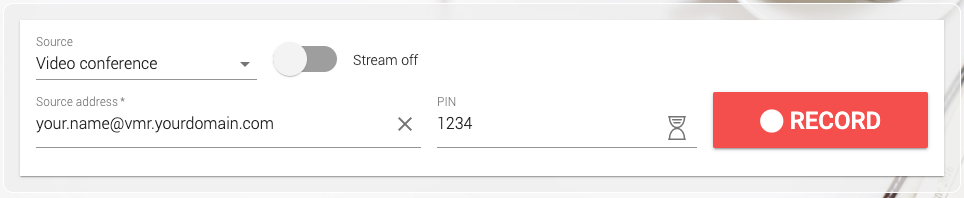
REC.VC dials out to the Pexip VMR and captures video and audio, and any content shared during the meeting.
3. Automatic recording of Pexip meetings
A VMR on both Pexip as-a-Service and Pexip Infinity can be configured to automatically connect your REC.VC recorder so that your meetings are always recorded, e.g. for compliance (financial sector) or simply for ease-of-recording purposes.
Automatic recording of Pexip VMRs can be configured by a Pexip administrator by using the Autodial feature available under Advanced settings of the VMR in question. Both SIP and RTMP based recording is supported when using this feature.

4. Managing and sharing your recorded Pexip meetings
The real fun starts when you have made the recording and you are ready to share and manage it. Here is a video tutorial on how to use REC.VC to manage and share your recorded Pexip meetings:
Posted in Recording Tagged with: pexip, recording, RTMP, sip

August 5th, 2020 by admin
REC.VC makes it easy to live stream town hall meetings, product launches, investor updates, and more, directly from leading video conferencing platforms such as Cisco Webex (Events, Meetings, Teams), Pexip (as a service or Infinity) and StarLeaf.
New to REC.VC? Sign up for a free trial today!
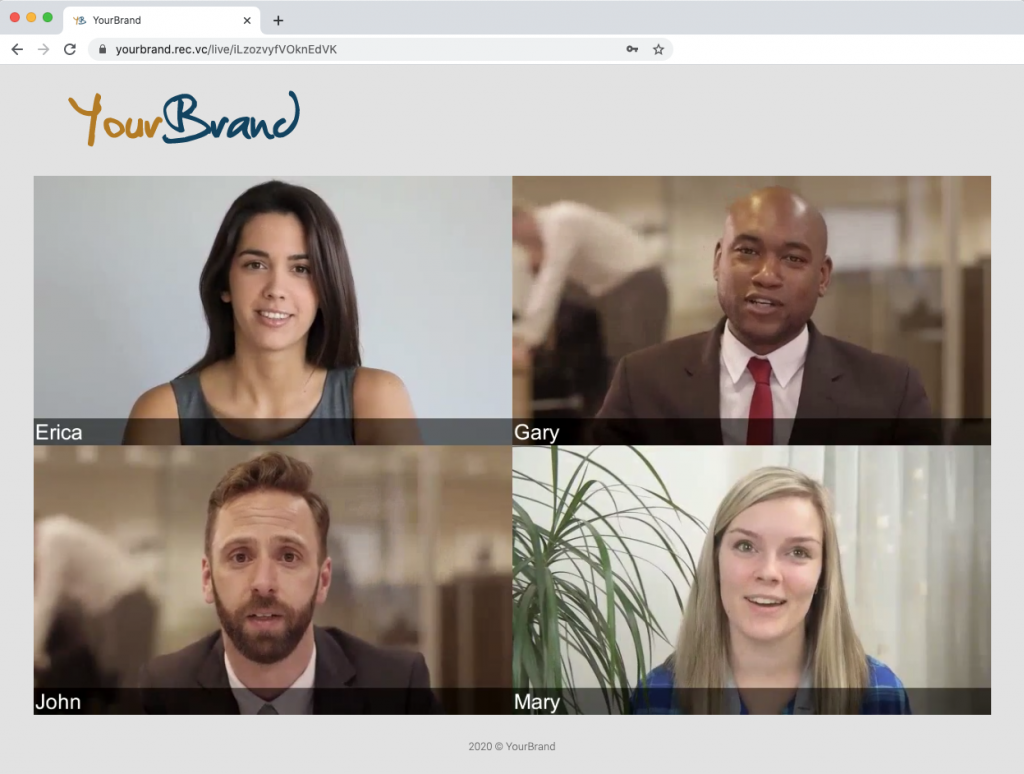
REC.VC customers have the option to upgrade their subscriptions with a customer branded portal to deliver a branded stream experience to their viewers. The branded portal is used for both live streams as well as playback of recorded live streams or meetings.
The following subscriptions are available for customers wanting their own branded portal:
| Brand Starter | Brand Pro | Brand Enterprise |
| Your Brand* | Yes | Yes | Yes |
| Portal URL | [brand].rec.vc | [name].yourdomain.com | [name].yourdomain.com |
| SIP URI | [alias]@rec.vc | [alias]@rec.vc | [alias]@[name].yourdomain.com |
| SSO** | No | No | Yes |
* Branding elements includes logo, colors and favicon
** SAML 2.0 integration for Single sign-on (SSO) and auto-provisioning of users
Contact sales@rec.vc for more details about customer branded portals.
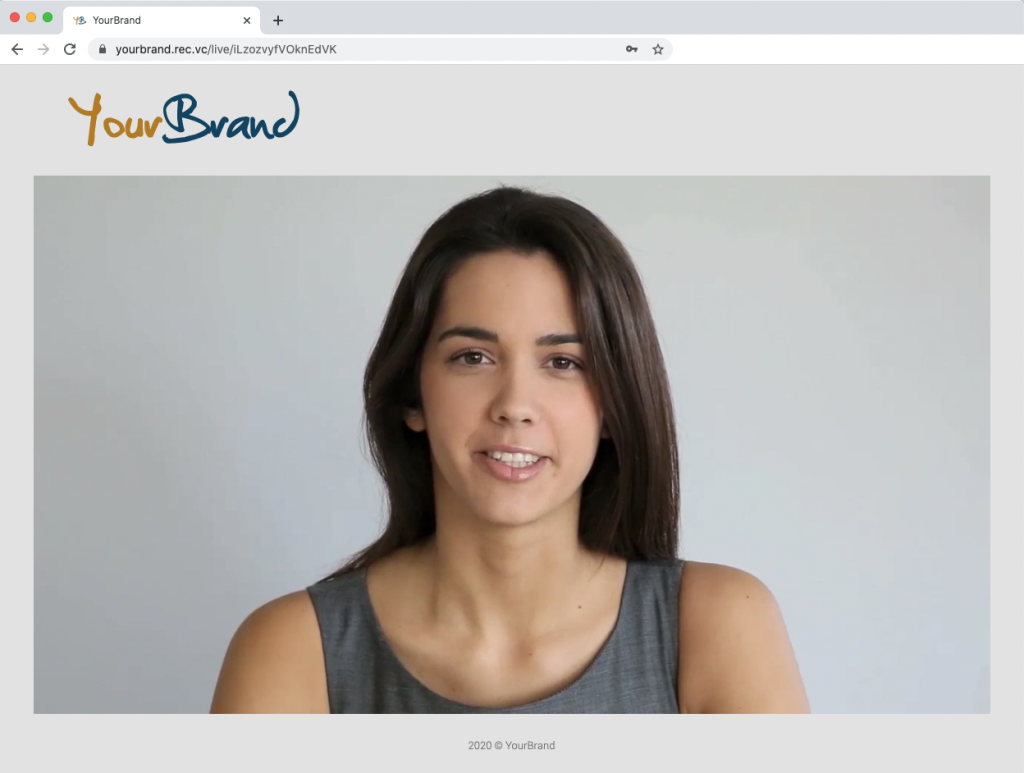
Live streaming from Cisco, Pexip and StarLeaf
We have below included some screenshots showing how a customer branded portal works when live streaming from various collaboration platforms.
 Example: Live stream Cisco Webex
 Example: Live stream from Pexip
 Example: Live stream from StarLeaf
 Example: Live stream directly from a video conferencing endpoint, e.g. Cisco
Posted in Live Streaming, Uncategorized, Webcast, white label Tagged with: cisco webex, live streaming, pexip, starleaf
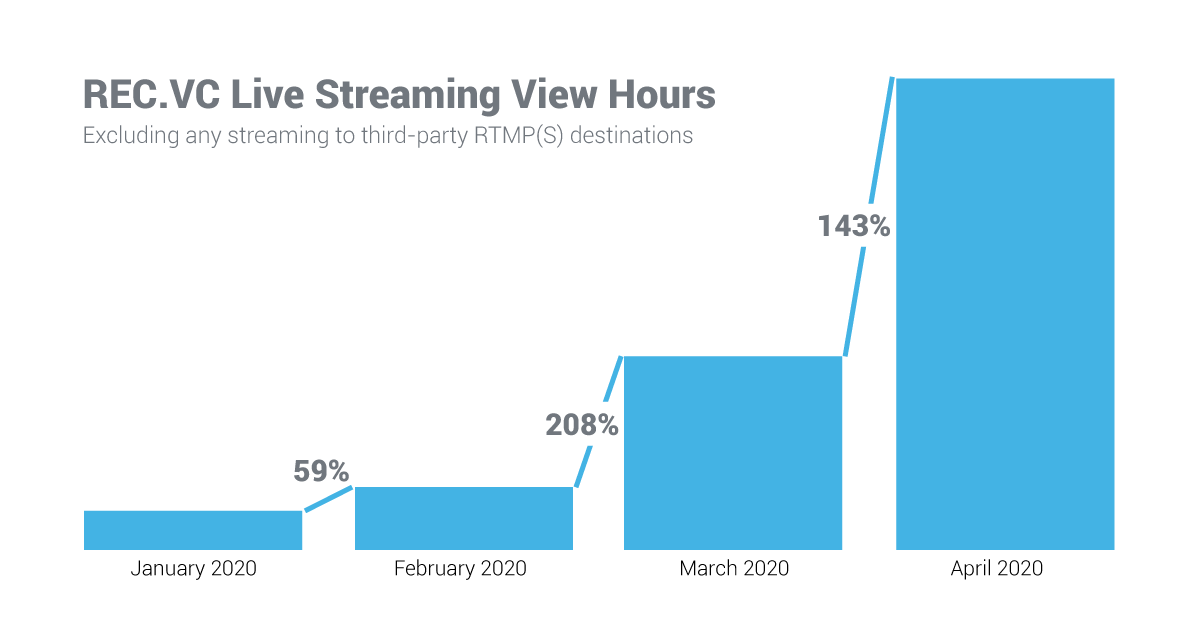
143% growth from March to April
The REC.VC recording & streaming cloud service continues to serve organizations needing to communicate effectively and securely with its internal and external stakeholders during COVID-19.
The number of live streaming view hours consumed by customers in April 2020 shows a 143% growth compared to March 2020, and a 1091% growth compared to January 2020.
Customers typically use the REC.VC service to live stream from their video conferencing platform or service such as Cisco (Webex Events, Webex Meetings and Webex Teams, and Cisco Meeting Server (CMS)), Pexip, Poly, StarLeaf and Zoom.
Thank you to all resellers, customers and users for your trust in the REC.VC recording & streaming cloud service.
New to REC.VC? Sign up for a free trial today!
Posted in Live Streaming Tagged with: live streaming, pexip, starleaf, webex events, webex meetings, webex teams
March 30th, 2020 by admin
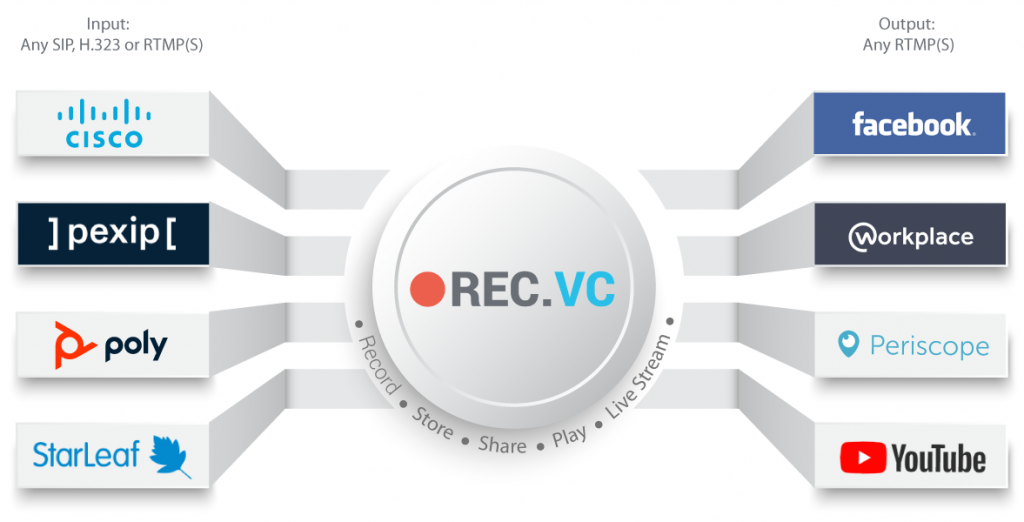
You have two alternatives for where mixing of video and content take place when using REC.VC to record or live stream (REC.VC hosted or on Facebook, Workplace or YouTube) a video meeting:
- Mixing on the videoconference platform or service (e.g. by Cisco collaboration platform/service (Webex Events, Webex Meetings, Webex Teams, Cisco Meeting Server (CMS)), or Pexip (Cloud or Infinity)).
- Mixing on REC.VC side based on two streams from the remote side.
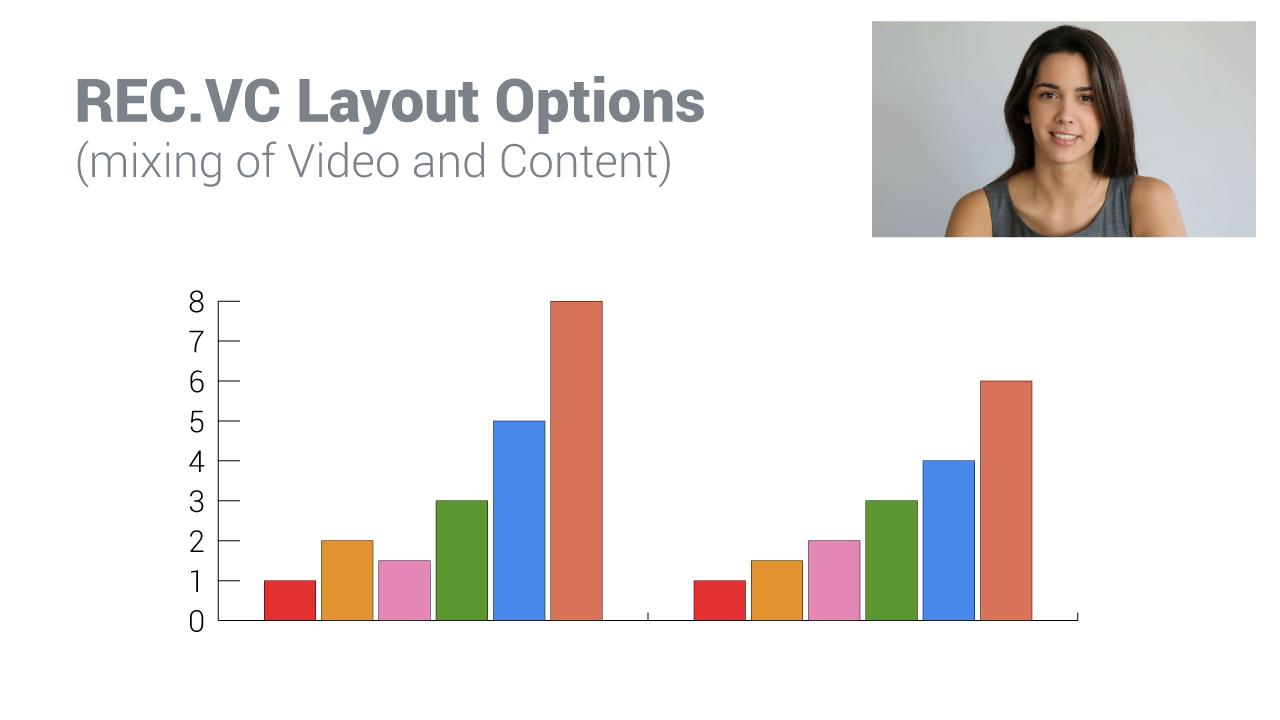
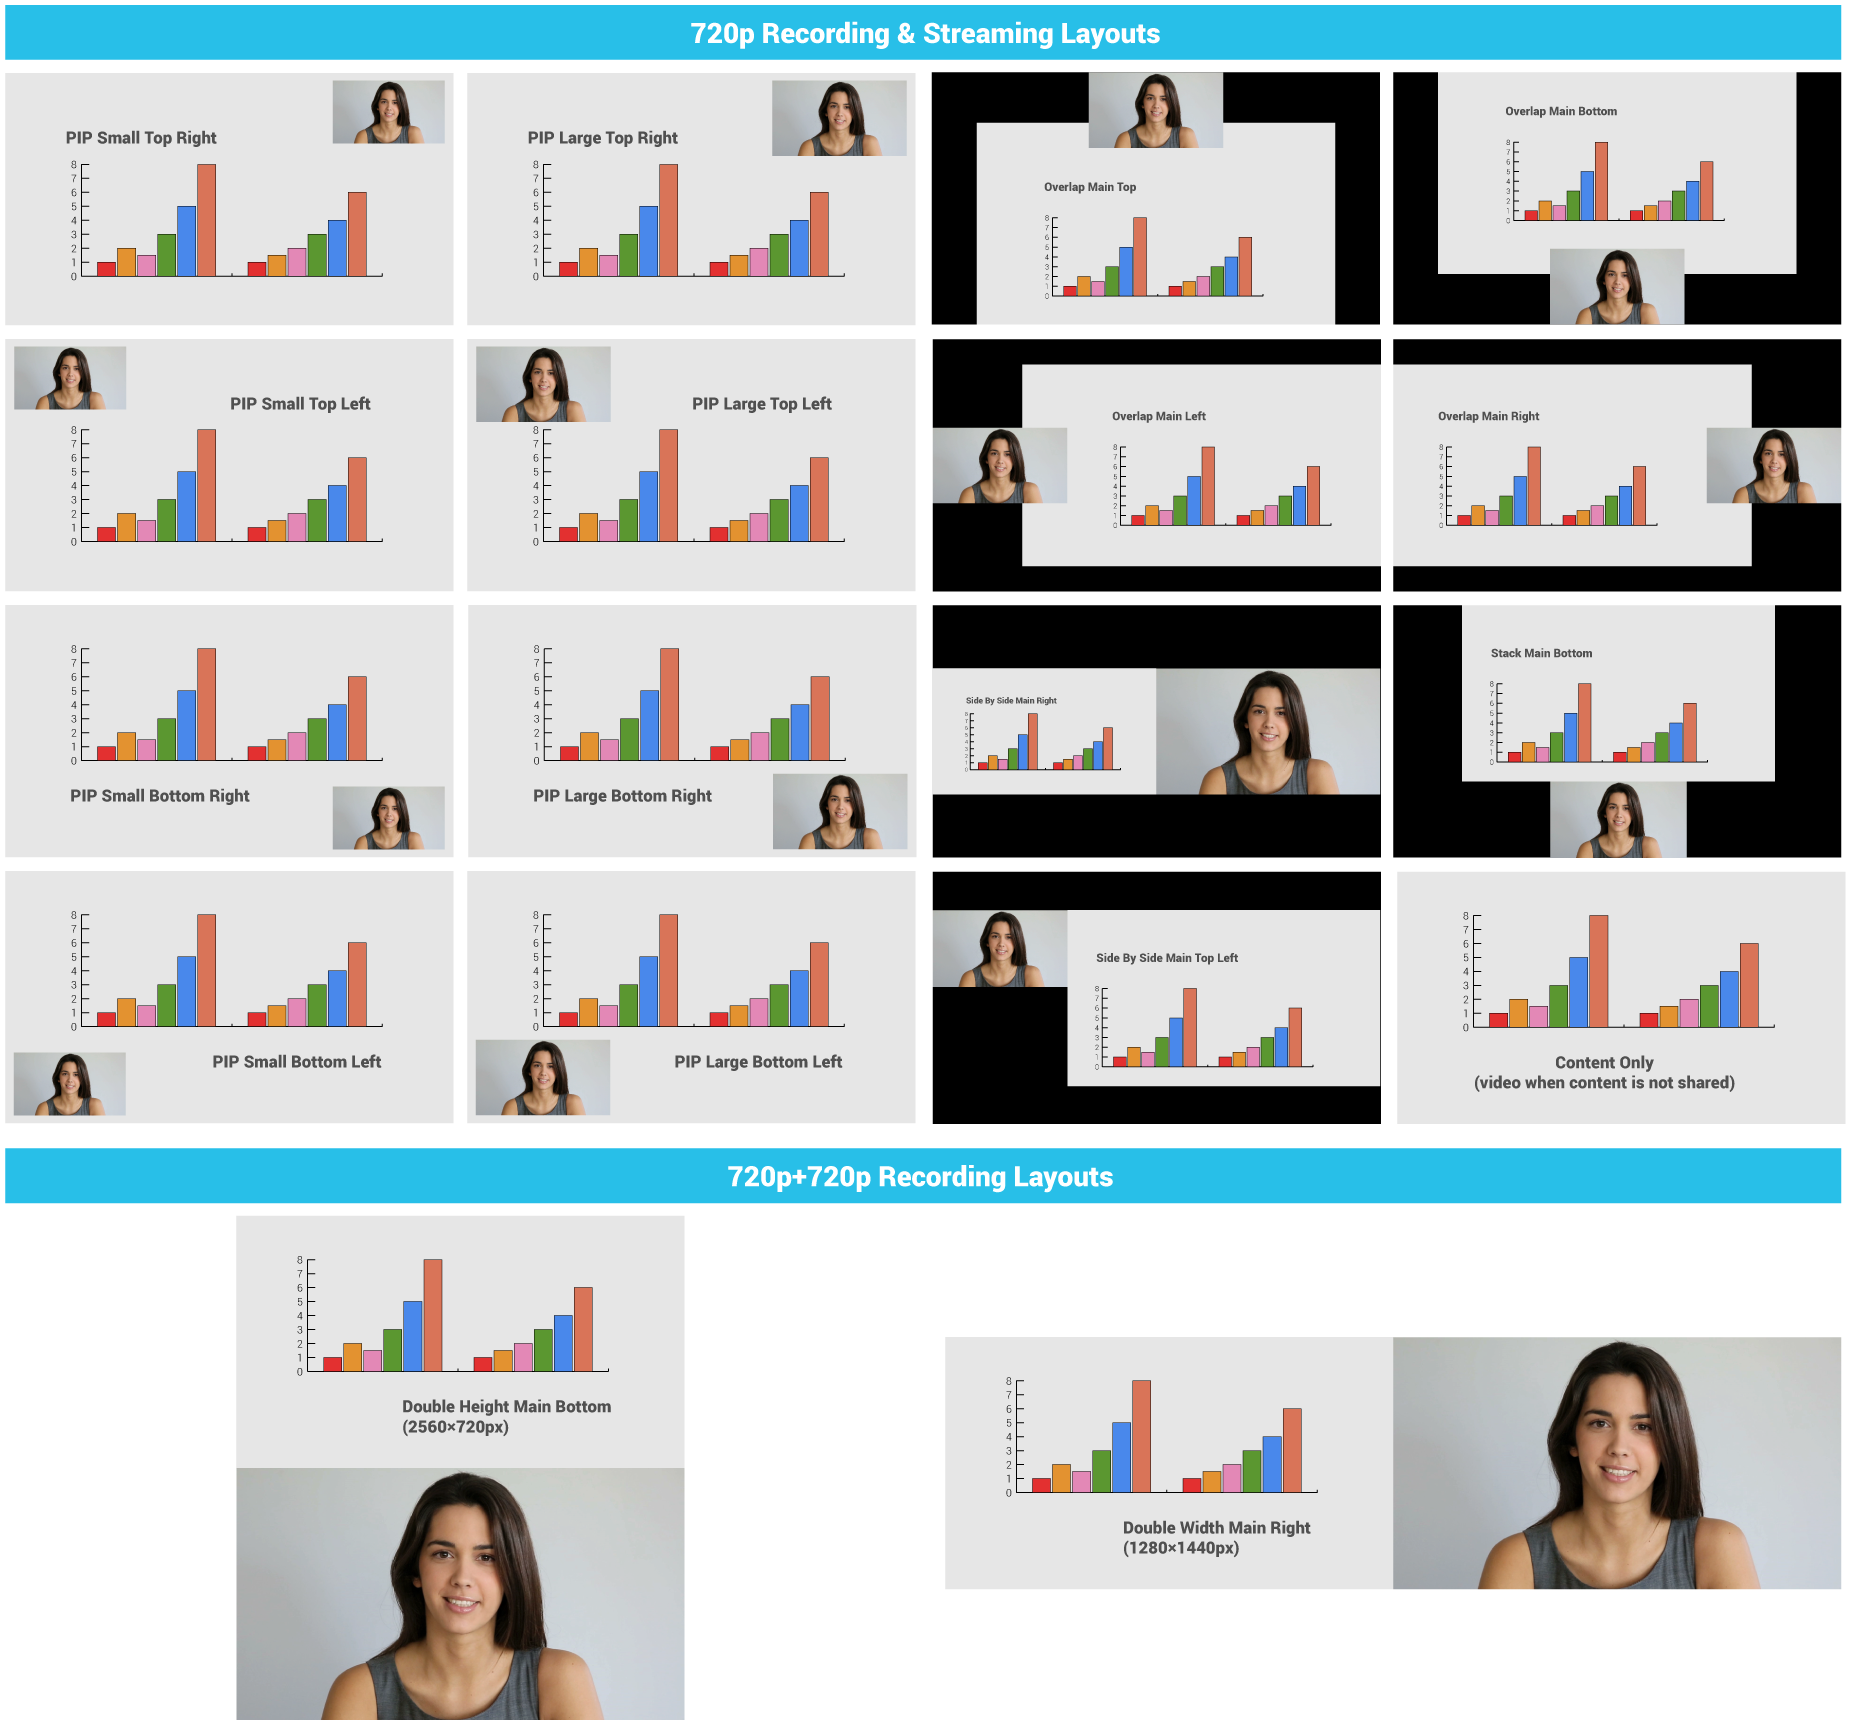
REC.VC offers 18 layouts when mixing takes place on REC.VC side:
- 16 layouts for regular 720p (1280×720) recording & streaming
- 2 layouts for special 720p x 2 recording for maximum quality
How to enable or change a layout?
A REC.VC Admin Users can change the layout for a user within own organization:
- Go to the edit interface of the Recorder in question
- Enable BFCP* (if not already enabled)
- Select layout from the Video Layout dropdown
If you do not have admin permission, please contact your REC.VC Admin User or email support@rec.vc to request a Video Layout for your account.
* Technical: When BFCP is enabled, REC.VC will receive two streams from the remote side (content + people) and mix according to the selected Video Layout. For customers on the rec.vc domain, or for customers with Recorders registered to own VCS, the VCS will do the interworking between H.239 (H.323) and BFCP (SIP).
New to REC.VC? Sign up for a free trial today!
Posted in Uncategorized Tagged with: cisco webex, live streaming, pexip, recording, video layout
We invite existing resellers and customers to test the soon to be released REC.VC RTMP Recording feature enabling capture from any RTMP source including:
- Pexip (as an alternative to SIP)
- Video/audio mixers
- IP cameras
REC.VC RTMP recording will capture any quality received, so if you send 720p, 1080p or 4K, it will be recorded and stored in the original quality.
To test the REC.VC RTMP Recording feature in Private Beta, please email support@rec.vc with your recorder SIP URI to receive information on how to use the RTMP recording feature.
New to REC.VC? Sign up for a free trial and we’ll notify you when we move to public beta.
We appreciate your help in testing this new feature!
Posted in New features, Recording Tagged with: pexip, recording, RTMP

September 6th, 2016 by admin
Watch this video to learn how you easily can record a Pexip meeting with REC.VC
Posted in How to, Video clip Tagged with: pexip, recording