
August 13th, 2020 by admin
REC.VC makes it easy for anyone to record & share their Pexip meetings in a secure and effective way, increasing the value of the meeting itself.
We are in this blog post covering how you can record a Pexip meeting based on the following Pexip options:
- Pexip as-a-Service (Pexip’s cloud service)
- Pexip Infinity (software deployed by your organization or service provider)
Prerequisites
1. Recording a meeting on Pexip as-a-Service
You can record a meeting by initiating the recording from the Pexip user interface side or by doing it via the REC.VC user interface.
REC.VC supports both SIP and RTMP recording when it is initiated via the Pexip user interface. When the recording is initiated via the REC.VC user interface, only SIP recording is applicable.
1.1 Recording via the Pexip as-a-Service interface (using SIP or RTMP)
1.1.1 SIP based recording
You can call out from your Pexip VMR just like you would call out to any SIP based video conferencing endpoint, here are the steps:
Step 1: Click on Show participants

Step 2: Click on Invite someone

Step 3: Enter the SIP URI (video address) of your REC.VC recorder, typically your.name@rec.vc (the actual address is listed at the top of the REC.VC user interface) and then click on the + button.

Step 4: To start recording, click on the green Dial button

Pexip dials out to your REC.VC recorder which joins as a regular participant and captures any video and audio, and any content shared in your meeting.
1.1.2 RTMP based recording
Step 1: Click on Show participants

Step 2: Click on Stream/record now

Step 3: Copy and paste your REC.VC RTMP(S) URL (available in the REC.VC user interface when Source is set to RTMP(S)) into the “Server or stream URL” field in the Pexip user interface (no need to fill in the other fields).

Step 4: Click on the “Start stream now” button
Pexip sends the RTMP feed containing video and audio, and any content shared, to your REC.VC RTMP recorder. The recording will be in the same resolution (720p, 1080p, etc) as received from Pexip.
1.2 Recording via the REC.VC interface (using SIP)
An alternative way for SIP based recording is to initiate the call between Pexip and REC.VC from the REC.VC side. Here are the steps:
Step 1: Access your REC.VC account (my.rec.vc)

Step 2: Enter the SIP URI of your Pexip VMR (typically something like your.name@pexip.me) and enter the PIN code for your VMR if it is PIN code protected, and hit the RECORD button.

REC.VC dials out to the Pexip VMR and captures video and audio, and any content shared during the meeting.
2. Recording a meeting on Pexip Infinity
Similarly to Pexip as-a-Service, recording a meeting on Pexip Infinity can be initiated on the Pexip side (SIP or RTMP recording) or on the REC.VC side (SIP recording).
2.1 Recording via the Pexip Infinity interface (using SIP or RTMP)
Pexip Infinity offers two user interfaces, webapp1 (legacy) and webapp2 (the latest). We will here cover both user interfaces in terms of how you can record a meeting using either interface. Please note that both user interfaces are highly customizable and that the steps below are based on the out-of-the-box versions.
2.1.1 SIP based recording (webapp1)
Step 1: Click on Add a new Participant

Step 2: Enter the SIP URI (video address) of your REC.VC recorder, typically your.name@rec.vc (the actual address is listed at the top of the REC.VC user interface) and click OK.

2.1.2 RTMP based recording (webapp1)
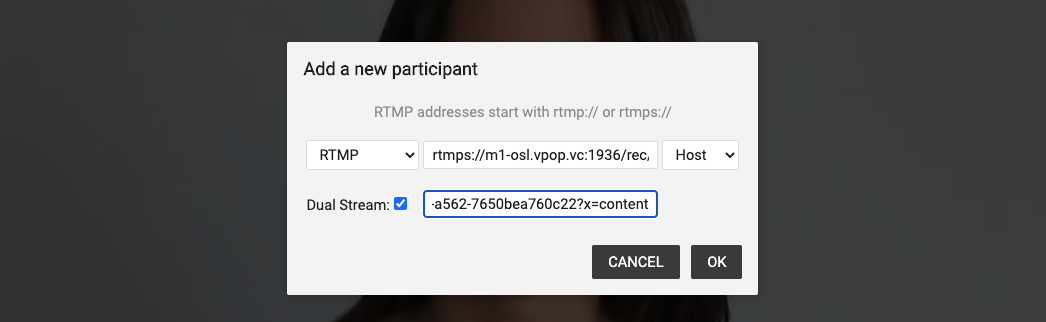
Step 1: Click on Add a new Participant

Step 2: Copy and paste your REC.VC RTMP(S) URL (available in the REC.VC user interface when Source is set to RTMP(S)) into the RTMP address field in the Pexip user interface

Pexip sends the RTMP feed containing video and audio, and any content shared, to your REC.VC RTMP recorder. The recording will be in the same resolution (720p, 1080p, etc) as received from Pexip.
Optionally, if you want to record video & audio, and content as two separate recordings, you can check the Dual Stream option and copy paste your REC.VC RTMP(S) URL to the second RTMP field. Please note that as Pexip requires the RTMP(S) URLs to be unique, you’ll need to add a random variable at the end of your REC.VC RTMP(S) URL (in our example below we have added “?x=content”).
2.1.3 SIP based recording (webapp2)
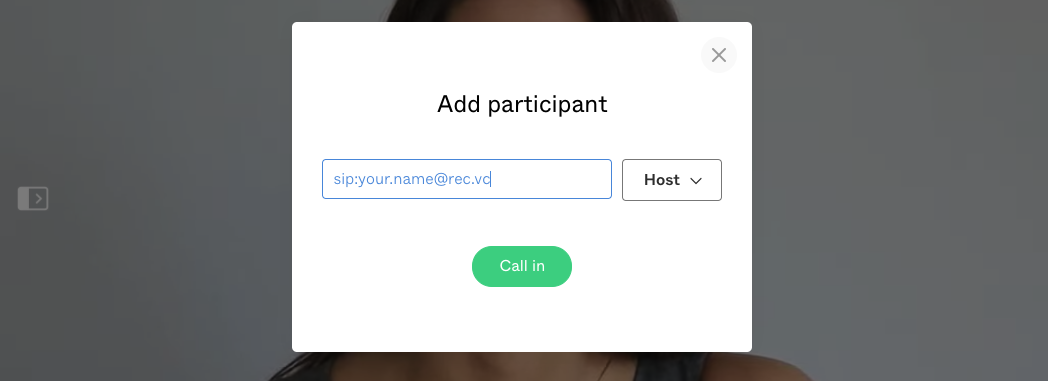
Step 1: Click on Add participant

Step 2: Enter the SIP URI (video address) of your REC.VC recorder, typically your.name@rec.vc (the actual address is listed at the top of the REC.VC user interface) and click Call in. Please note that you need to specify “sip:” at the beginning of the SIP URI.
Pexip dials out to your REC.VC recorder which joins as a regular participant and captures any video and audio, and any content shared in your meeting.
2.1.4 RTMP based recording (webapp2)
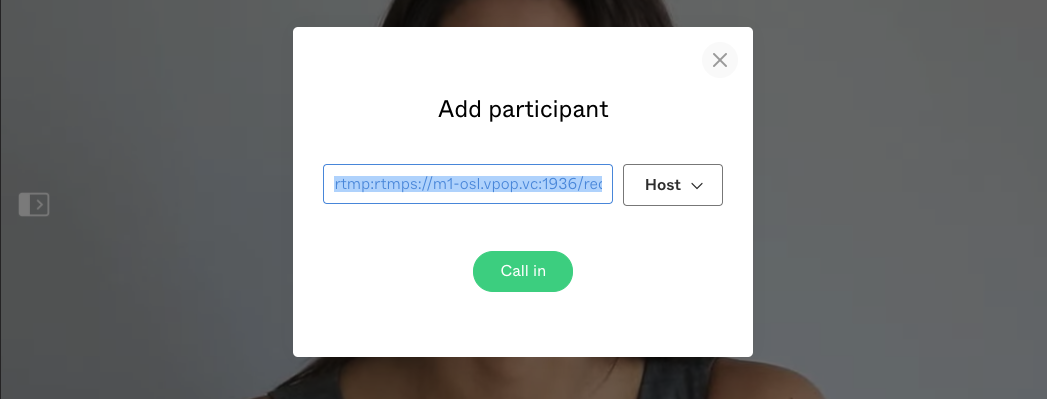
Step 1: Click on Add participant

Step 2: Copy and paste your REC.VC RTMP(S) URL (available in the REC.VC user interface when Source is set to RTMP(S)) into the address field in the Pexip user interface and click Call in. Please note that you need to specify “rtmp:” at the beginning of the REC.VC RTMP(S) URL.
Pexip sends the RTMP feed containing video and audio, and any content shared, to your REC.VC RTMP recorder. The recording will be in the same resolution (720p, 1080p, etc) as received from Pexip.
2.2 Recording via the REC.VC interface (using SIP)
An alternative way for SIP based recording is to initiate the call between Pexip and REC.VC from the REC.VC side. Here are the steps:
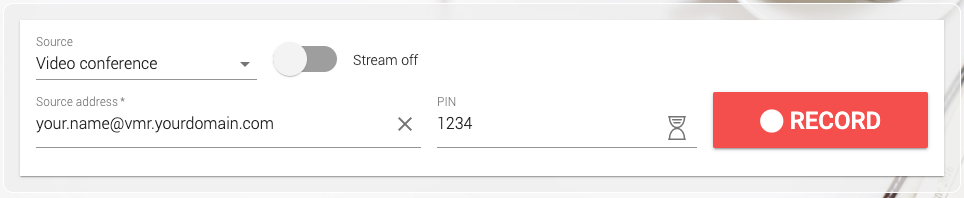
Step 1: Access your REC.VC account (my.rec.vc)
Step 2: Enter the SIP URI of your Pexip VMR (typically something like your.name@vmr.yourdomain.com) and enter the PIN code for your VMR if it is PIN code protected, and hit the RECORD button.
REC.VC dials out to the Pexip VMR and captures video and audio, and any content shared during the meeting.
3. Automatic recording of Pexip meetings
A VMR on both Pexip as-a-Service and Pexip Infinity can be configured to automatically connect your REC.VC recorder so that your meetings are always recorded, e.g. for compliance (financial sector) or simply for ease-of-recording purposes.
Automatic recording of Pexip VMRs can be configured by a Pexip administrator by using the Autodial feature available under Advanced settings of the VMR in question. Both SIP and RTMP based recording is supported when using this feature.

4. Managing and sharing your recorded Pexip meetings
The real fun starts when you have made the recording and you are ready to share and manage it. Here is a video tutorial on how to use REC.VC to manage and share your recorded Pexip meetings:
Posted in Recording Tagged with: pexip, recording, RTMP, sip

December 14th, 2017 by admin
We are excited to announce the release of 16 new REC.VC layouts providing users with greater flexibility for mixing of content and people when recording & streaming their video calls, training sessions or town hall meetings.
The release includes the following:
- 14 layouts provide users with a regular 720p (1280×720)Â recording & streaming.
- 2 layouts provide users with special 720p x 2 recording for maximum quality, either as the Double Width layout (2560×720) or the Double Height layout (1280×1440). During live streams, these layouts will be scaled down to regular 720p format.
How to enable or change a layout?
In the current version, REC.VC Admin Users can change the layout for a user with the following steps:
- Go to the edit interface of the Recorder in question
- Enable BFCP* (if not already enabled)
- Select layout from the Video Layout dropdown
If you do not have admin permission, please contact your REC.VC Admin User or email support@rec.vc to request a Video Layout for your account.
* Technical: When BFCP is enabled, REC.VC will receive two streams from the remote side (content + people) and mix according to the selected Video Layout. For customers on the rec.vc domain, or for customers with Recorders registered to own VCS, the VCS will do the interworking between H.239 (H.323) and BFCP (SIP).
Feel free to contact support@rec.vc with any questions or comments.
New to REC.VC? Sign up for a 14 day free trial today!
The layouts …Â

Posted in Live Streaming, New features, Recording, Uncategorized Tagged with: BFCP, h.239, h.323, mixing, sip, video layout
November 19th, 2015 by admin
Recording should be a key component in any Video Conferencing (VC) service offering. At REC.VC we are convinced it is best provided to customers and users under the brand of the VC service. Service providers may evaluate one or a combination of the following white label approaches for REC.VC:
- Register recorder addresses with your domain
- White label the REC.VC user portal with your brand
- Add recording button to your existing user interface
Register recorder addresses with your domain
As a service provider, you may already be providing your users with their personal video address or SIP URIs, e.g. username@yourbrand.com. You can in a similar fashion provide users with their personal recorder video address, e.g. username.rec@yourbrand.com or username@rec.yourbrand.com.
REC.VC recorders can register to any SIP registrar (just like any SIP device) but depending on the use case and interop requirements, registering the recorders to a Cisco VCS may be the way to go. For 1st line support and troubleshooting purposes we recommend that the SIP registrar in question is under your management (which is likely the point anyway since your existing domain(s) point to this SIP registrar). Alternatively, REC.VC can provide SIP registrar whom you can point your domain to (SRV records).
White label the REC.VC user portal with your brand
As multitenant cloud platform, REC.VC enables white label sites per reseller or service provider (and even for each customer subject to commercial terms). Each white label site can be provisioned with:
- Your preferred domain (e.g. rec.yourbrand.com) or yourbrand.rec.vc
- Your logo, favicon.ico and font(s)
- Your colors on buttons and backgrounds
- Your content (title, body, footer, etc)
The white label sites come with an optional registration field enabling resellers and service providers to use the site for lead-gen purposes in addition to providing existing users with a recording and playback user interface.
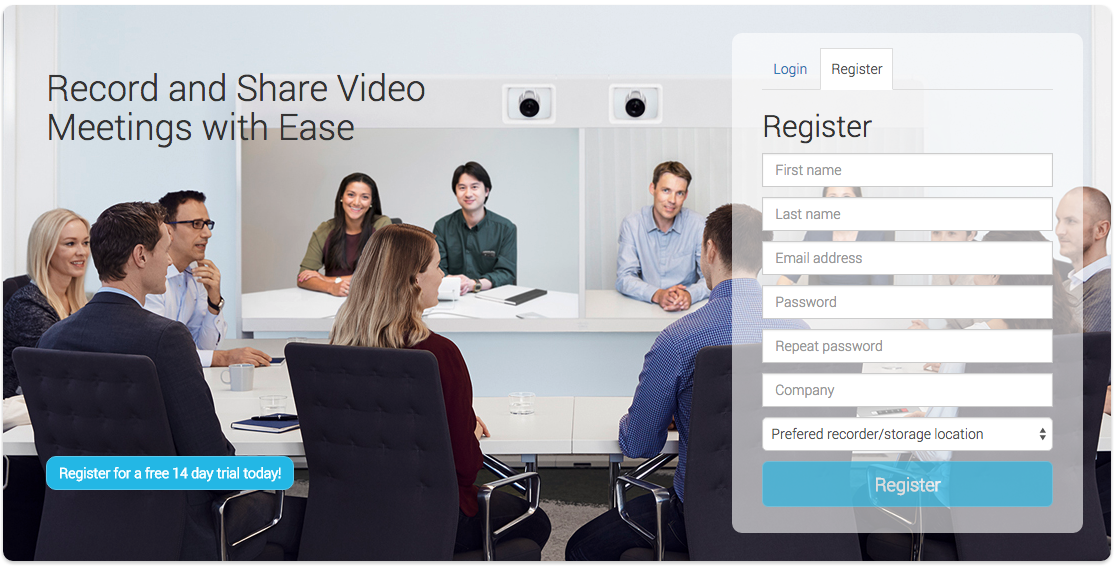
You may visit my.rec.vc and yourbrand.rec.vc to see examples of REC.VC sites (in addition to the screenshots illustrating this blog post).

Add recording button to your existing interface
For service providers and vendors/manufacturers wanting to make REC.VC recording, streaming and/or playback an integral part of their existing user interface, we recommend using the REC.VC APIÂ which includes all the features and capabilities available in the REC.VC user portal. The API can e.g. be used in the following areas:
- Provisioning of Companies (in hierarchical structure, parent/child relation), and users and recorders within Companies.
- Call control for calling out from the recorders (to be used when adding recording button to your existing interface), disconnecting calls, and retrieval of call statistics.
- Retrieval of recorded video meta data (video thumbnail, title, URL) for playback in your existing user interface or portal.
Posted in Channel, Uncategorized Tagged with: api, multitenant, recording, sip, video conference, white label