November 12th, 2020 by admin
Zoom is a fantastic collaboration tool empowering users to meet on video, chat, share content, record, live stream, and more!
The REC.VC cloud service works great with Zoom, enabling users to securely record, store and share any of their Zoom meetings. Users can optionally also live stream Zoom meetings on the REC.VC service or stream it to social media such as Facebook and YouTube.
For both recording and live streaming scenarios, you can use REC.VC to capture with your preferred Zoom Layout and REC.VC Mixing of Video and Content. Here is an overview based on how you connect REC.VC to your Zoom meeting:
|
REC.VC mode |
REC.VC features available |
Capture using …
|
Record
-only |
Live
Stream |
Set Zoom Layout |
REC.VC Mixing |
Automatic FTP export |
SIP/H.323 Connector |
Yes |
Yes |
Yes |
Yes |
Yes |
Custom Live Stream |
Yes |
No* |
No |
No |
Yes |
* REC.VC to introduce live streaming with RTMP as source in 2021
Capture Zoom meeting using Zoom H.323/SIP Room Connector
If your organization has the Zoom H.323/SIP Room Connector enabled, you can use REC.VC to capture video, audio and content in Zoom meetings. The recommended way is to connect your REC.VC account to Zoom by placing a call from the REC.VC user interface to the Zoom meeting using Zoom the SIP Dial String format:
| Meeting feature | SIP Dial String |
Meetings without a passcode,
default Zoom layout | [Meeting ID]@[IP Address] |
Meetings with a passcode,
default Zoom layout | [Meeting ID].[Passcode]@[IP Address] |
Meetings with a passcode,
Zoom Layout selection | [Meeting ID].[Passcode].[Layout]@[IP Address] |
Meetings without a passcode,
Zoom Layout selection | [Meeting ID]..[Layout]@[IP Address] |
[Meeting ID], [Passcode] and [IP Address] can be found in the Meeting Invitation available via your Zoom account. We recommend that you use the IP address in the same Country/Region as where your REC.VC account is provisioned. For reference, the following table provides an overview of the REC.VC Locations with corresponding Zoom Locations and IP Addresses (as of November 12, 2020):
| REC.VC Location | Zoom Location | Zoom IP Address |
| Ashburn, USA | US East | 162.255.36.11 |
| Frankfurt, Germany | Germany | 213.244.140.110 |
| Oslo, Norway | Germany or Netherlands | 213.244.140.110 or 213.19.144.110 |
By default, if the Dial String does not include [Layout], REC.VC will capture the Zoom Gallery View Layout. The following table provides an overview of the Zoom Layouts available based on [Layout] inclusion in Dial String:
| Gallery | Default (No [Layout] in Dial String) |
| Full Screen | 11 in Dial String |
| Active | 1111 in Dial String |
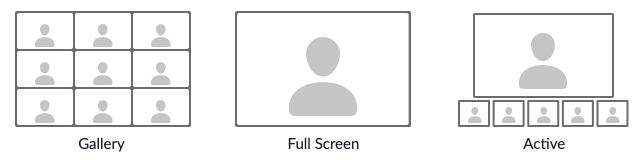 Set Zoom Layout to be captured in the Dial String (Full screen = 11, Active = 1111)
The Dial String for the Zoom meeting is entered as Source address in the REC.VC user interface:
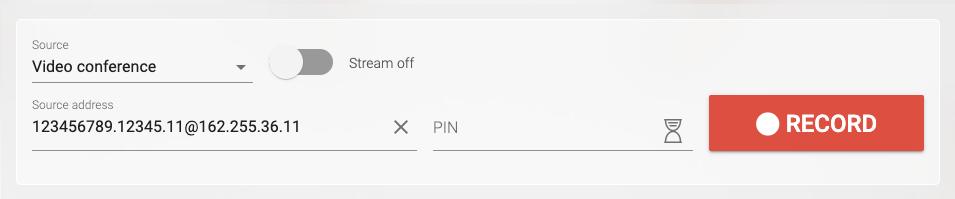 Record a Zoom meeting
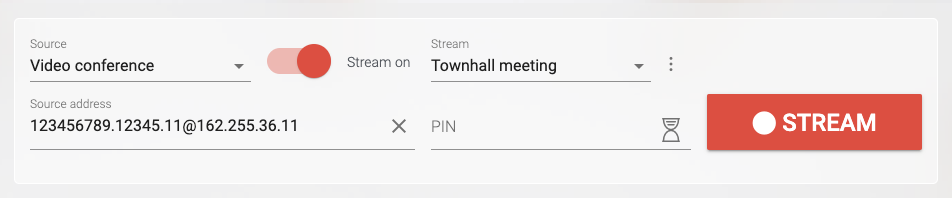 Live stream a Zoom meeting
The following REC.VC features are also available when using the Zoom H.323/SIP Room Connector for capture:
- REC.VC Mixing of video and content based on the available REC.VC layouts
- REC.VC Automatic export of recordings to any (S)FTP(S) server on your side
Both features are available for REC.VC Admins. To get Admin permission to your account and additional description of how the features work, please contact support@rec.vc.
Capture Zoom meeting using Zoom Custom Live Streaming (RTMP)
To simply capture the Zoom meeting, without any layout options on Zoom or REC.VC side, you can use the REC.VC RTMP recorder. Here is how to configure it for your Zoom account.
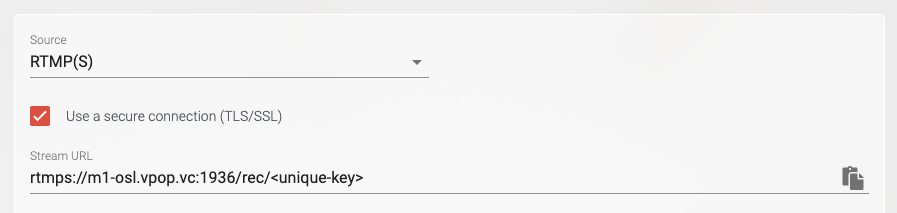
In your REC.VC account, set Source to RTMP(S) and copy the Stream URL of your account:
 Record a Zoom meeting using custom live streaming RTMP
In your Zoom web account, go to Meetings > Personal Room > Live Streaming and click on Edit under Configure custom live stream … (If this is not available in your Zoom web account, contact your Zoom administrator to get it enabled for you).
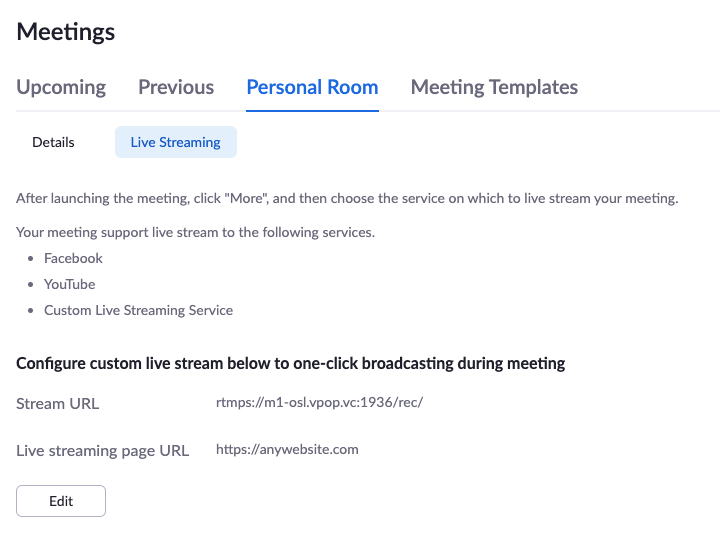 Configure Zoom account with REC.VC RTMP Recording using Zoom Custom Live Stream
Copy the Stream URL from your REC.VC account into the Stream URL field in the Zoom interface, and move the <stream-key> part of the URL (after /rec/) to the Stream key field. As this feature is only used for recording and not live streaming, you may enter any address as the Live streaming page URL.
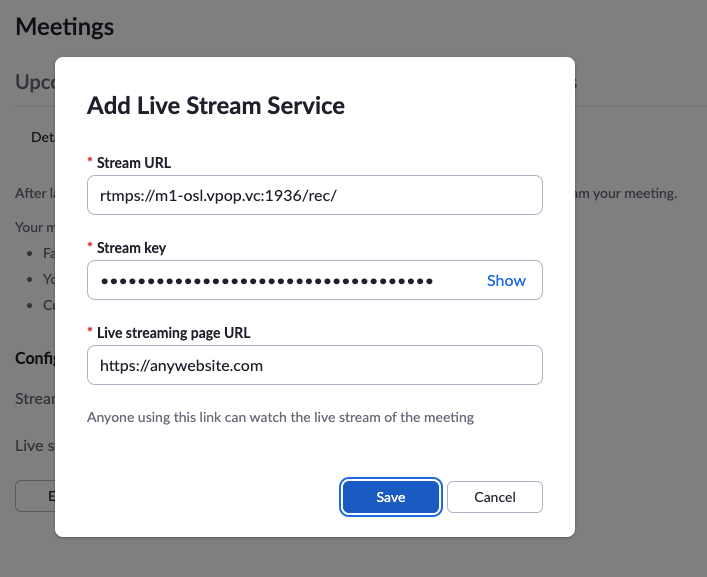 Enter REC.VC RTMP URL in Zoom account
With the Custom Live Streaming feature configured in your Zoom web account, you can start securely recording your Zoom meetings with REC.VC by clicking on More and Live on Custom Live Streaming Service in the Zoom User Interface:
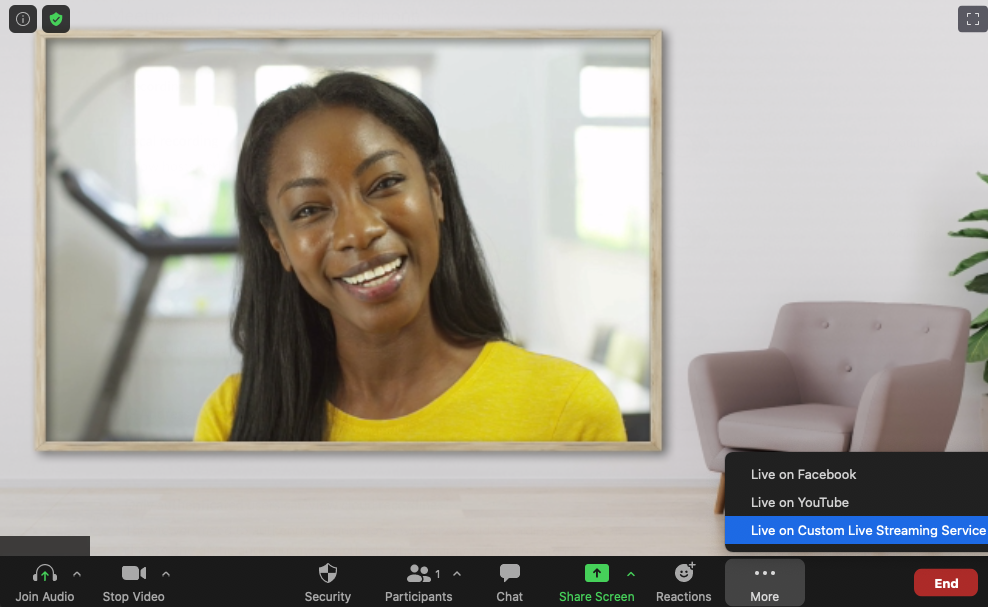 Start recording by clicking on the Custom Live Streaming button
Unless you change the Custom Live Streaming configuration inside your Zoom web account, the REC.VC RTMP recorder will always be two clicks away whenever you are in your Zoom room.
REC.VC compliance and security
- The service is hosted out of private data centers in Europe and USA with strict access control and 24/ monitoring.
- Recordings are always encrypted at rest (AES 256 bit) and any access to the cloud service is encrypted.
- REC.VC comply with GDPR, HIPAA, MIFID II, PIPEDA, and many more national and regional privacy laws and regulations.
- REC.VC is ISO 27001 certified with annual audits performed by Lloyd’s Register.
How to use REC.VC
For more details on how to use REC.VC, please see the generic video tutorials below. You can also sign up for a free trial account here.
How to record a video conference
How to stream and record a video conference
How to live stream a video conference on YouTube
How to record from any RTMP(S) source
Posted in How to, Live Streaming, Recording Tagged with: hipaa, live streaming, recording, RTMP, zoom

October 14th, 2020 by admin
Here is a guide to how you can use REC.VC to record a meeting on Google Meet.
Prerequisites
You’ll need the following to record a meeting on Google Meet using REC.VC:
We will in this guide cover how to use REC.VC with Pexip CVI as a Service to record a Google Meet. Note: The process is very similar for Pexip Infinity.
Google Meet enabled with support for third-party SIP endpoints/clients
The combination of Google Meet and Pexip CVI ensure that your SIP endpoints (Cisco, Polycom, Lifesize, etc) can call into a meeting on Google Meet.
In this context, REC.VC is simply another (virtual) SIP endpoint which you can instruct to call into a Google Meet for the purpose of capturing video, audio and any content shared in Google Meet.
How to record a Google Meet, step by step
1. Obtain the SIP address for the Google Meet
You can obtain the unique meeting SIP address for a Google meet in the following ways:
For scheduled meetings, unique meeting SIP address can be obtained by clicking on More joining options in the Calendar invite (for scheduled meetings) or by clicking on More numbers and room options while the meeting is in progress.
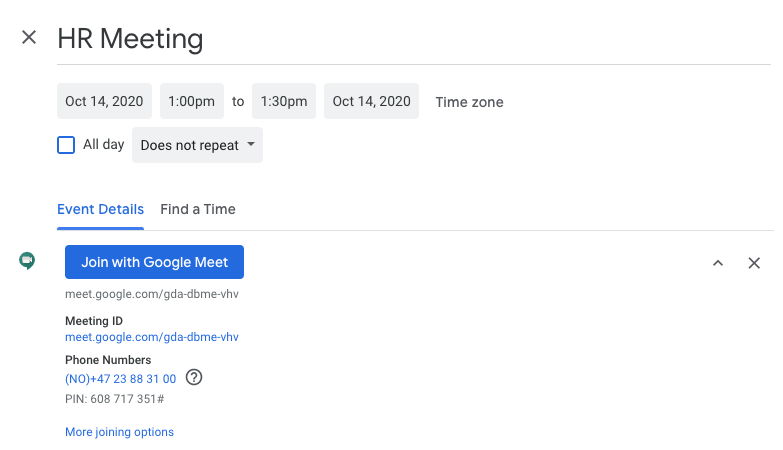 Calendar invite: Click on joining options
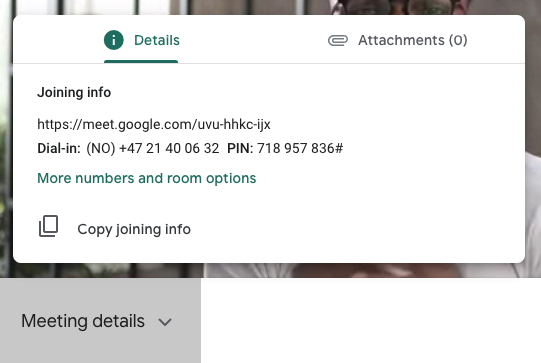 Meeting in progress: Click on More numbers and room options
When clicking on the link (before or during the meeting), you’ll get to a Google Meet page with two tabs: Dial-in numbers and Third-party systems. The unique meeting SIP address is listed under Third-party systems and has the following structure:
<unique-meeting-id>@gmeet.pexip.me
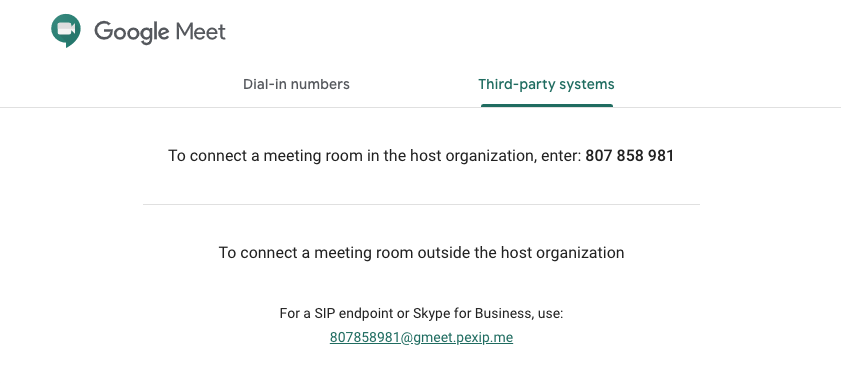 The unique meeting SIP address is listed under Third-party systems
2. Start recording the Google Meet
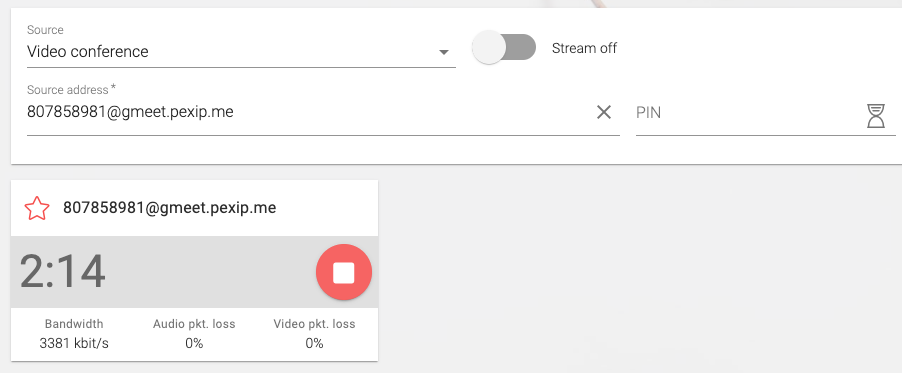
To start recording, access your REC.VC account and copy & paste the unique meeting SIP address (from step 1) to into the Source address field and click on the red RECORD button:
 REC.VC user interface: Add the unique meeting SIP address and click RECORD
REC.VC will then place a SIP call to the unique meeting address of the Google Meet. In the Google Meet user interface, you’ll be notified that your REC.VC recorder wants to join the meeting. REC.VC starts recording audio, video and content as soon as you Admit the recorder into Google Meet.
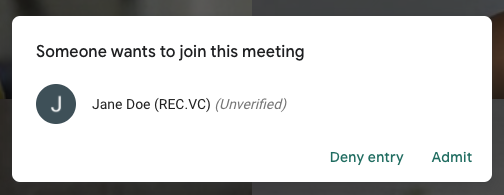 Google Meet user interface: Click on Admit to let REC.VC record the meeting
3. Stop recording the Google Meet
Whenever you want to stop recording, you can disconnect the REC.VC recorder in the Google Meet user interface by clicking on Remove from meeting, or click on the STOP button in the REC.VC user interface
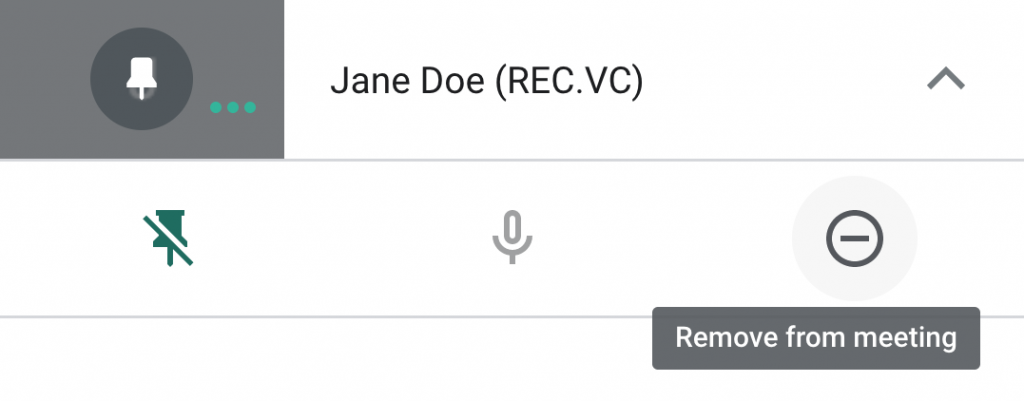 Google Meet user interface: Stop recording by removing recorder from meeting
4. Managing and sharing your recorded Google Meet meetings
The video tutorial below shows how you can manage, share, trim and delete your Google Meet recordings.
Posted in Uncategorized Tagged with: cvi, google meet, pexip, record meeting, recording

August 13th, 2020 by admin
REC.VC makes it easy for anyone to record & share their Pexip meetings in a secure and effective way, increasing the value of the meeting itself.
We are in this blog post covering how you can record a Pexip meeting based on the following Pexip options:
- Pexip as-a-Service (Pexip’s cloud service)
- Pexip Infinity (software deployed by your organization or service provider)
Prerequisites
1. Recording a meeting on Pexip as-a-Service
You can record a meeting by initiating the recording from the Pexip user interface side or by doing it via the REC.VC user interface.
REC.VC supports both SIP and RTMP recording when it is initiated via the Pexip user interface. When the recording is initiated via the REC.VC user interface, only SIP recording is applicable.
1.1 Recording via the Pexip as-a-Service interface (using SIP or RTMP)
1.1.1 SIP based recording
You can call out from your Pexip VMR just like you would call out to any SIP based video conferencing endpoint, here are the steps:
Step 1: Click on Show participants

Step 2: Click on Invite someone

Step 3: Enter the SIP URI (video address) of your REC.VC recorder, typically your.name@rec.vc (the actual address is listed at the top of the REC.VC user interface) and then click on the + button.

Step 4: To start recording, click on the green Dial button

Pexip dials out to your REC.VC recorder which joins as a regular participant and captures any video and audio, and any content shared in your meeting.
1.1.2 RTMP based recording
Step 1: Click on Show participants

Step 2: Click on Stream/record now

Step 3: Copy and paste your REC.VC RTMP(S) URL (available in the REC.VC user interface when Source is set to RTMP(S)) into the “Server or stream URL” field in the Pexip user interface (no need to fill in the other fields).

Step 4: Click on the “Start stream now” button
Pexip sends the RTMP feed containing video and audio, and any content shared, to your REC.VC RTMP recorder. The recording will be in the same resolution (720p, 1080p, etc) as received from Pexip.
1.2 Recording via the REC.VC interface (using SIP)
An alternative way for SIP based recording is to initiate the call between Pexip and REC.VC from the REC.VC side. Here are the steps:
Step 1: Access your REC.VC account (my.rec.vc)

Step 2: Enter the SIP URI of your Pexip VMR (typically something like your.name@pexip.me) and enter the PIN code for your VMR if it is PIN code protected, and hit the RECORD button.

REC.VC dials out to the Pexip VMR and captures video and audio, and any content shared during the meeting.
2. Recording a meeting on Pexip Infinity
Similarly to Pexip as-a-Service, recording a meeting on Pexip Infinity can be initiated on the Pexip side (SIP or RTMP recording) or on the REC.VC side (SIP recording).
2.1 Recording via the Pexip Infinity interface (using SIP or RTMP)
Pexip Infinity offers two user interfaces, webapp1 (legacy) and webapp2 (the latest). We will here cover both user interfaces in terms of how you can record a meeting using either interface. Please note that both user interfaces are highly customizable and that the steps below are based on the out-of-the-box versions.
2.1.1 SIP based recording (webapp1)
Step 1: Click on Add a new Participant

Step 2: Enter the SIP URI (video address) of your REC.VC recorder, typically your.name@rec.vc (the actual address is listed at the top of the REC.VC user interface) and click OK.

2.1.2 RTMP based recording (webapp1)
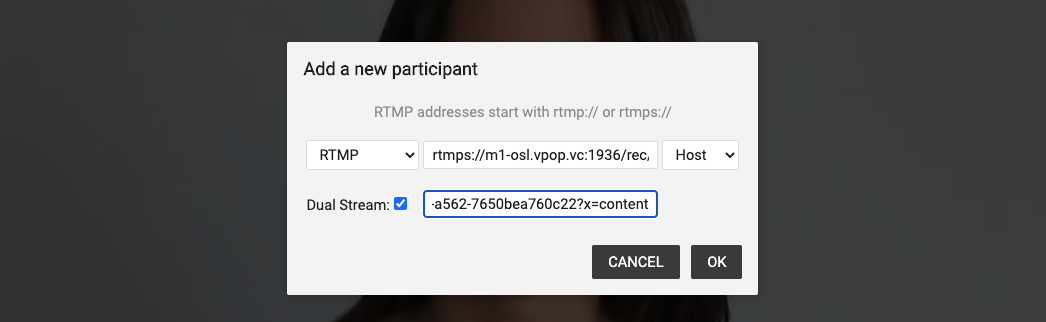
Step 1: Click on Add a new Participant

Step 2: Copy and paste your REC.VC RTMP(S) URL (available in the REC.VC user interface when Source is set to RTMP(S)) into the RTMP address field in the Pexip user interface

Pexip sends the RTMP feed containing video and audio, and any content shared, to your REC.VC RTMP recorder. The recording will be in the same resolution (720p, 1080p, etc) as received from Pexip.
Optionally, if you want to record video & audio, and content as two separate recordings, you can check the Dual Stream option and copy paste your REC.VC RTMP(S) URL to the second RTMP field. Please note that as Pexip requires the RTMP(S) URLs to be unique, you’ll need to add a random variable at the end of your REC.VC RTMP(S) URL (in our example below we have added “?x=content”).
2.1.3 SIP based recording (webapp2)
Step 1: Click on Add participant

Step 2: Enter the SIP URI (video address) of your REC.VC recorder, typically your.name@rec.vc (the actual address is listed at the top of the REC.VC user interface) and click Call in. Please note that you need to specify “sip:” at the beginning of the SIP URI.
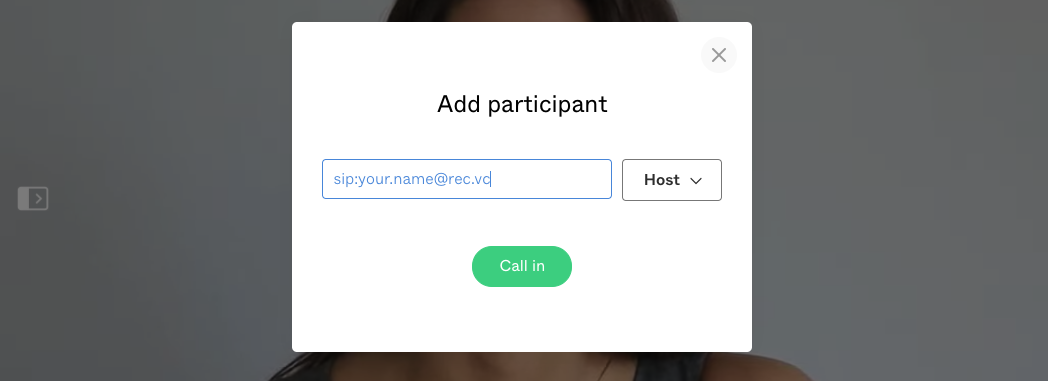
Pexip dials out to your REC.VC recorder which joins as a regular participant and captures any video and audio, and any content shared in your meeting.
2.1.4 RTMP based recording (webapp2)
Step 1: Click on Add participant

Step 2: Copy and paste your REC.VC RTMP(S) URL (available in the REC.VC user interface when Source is set to RTMP(S)) into the address field in the Pexip user interface and click Call in. Please note that you need to specify “rtmp:” at the beginning of the REC.VC RTMP(S) URL.
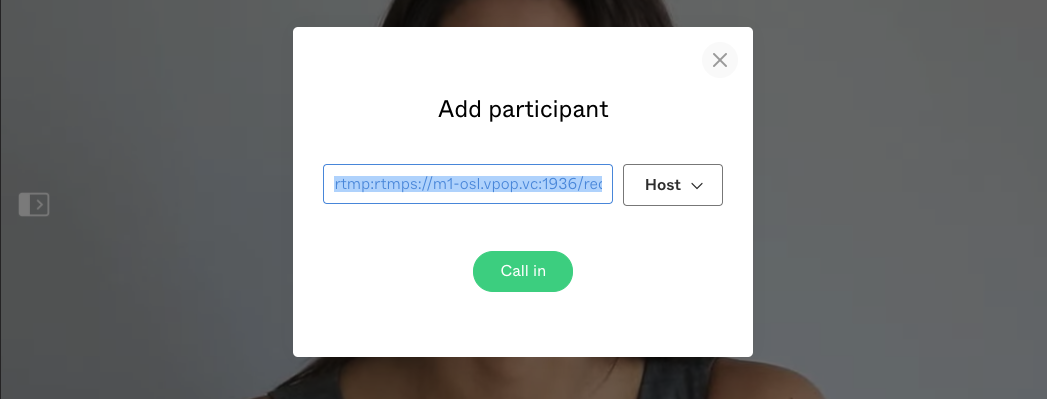
Pexip sends the RTMP feed containing video and audio, and any content shared, to your REC.VC RTMP recorder. The recording will be in the same resolution (720p, 1080p, etc) as received from Pexip.
2.2 Recording via the REC.VC interface (using SIP)
An alternative way for SIP based recording is to initiate the call between Pexip and REC.VC from the REC.VC side. Here are the steps:
Step 1: Access your REC.VC account (my.rec.vc)
Step 2: Enter the SIP URI of your Pexip VMR (typically something like your.name@vmr.yourdomain.com) and enter the PIN code for your VMR if it is PIN code protected, and hit the RECORD button.
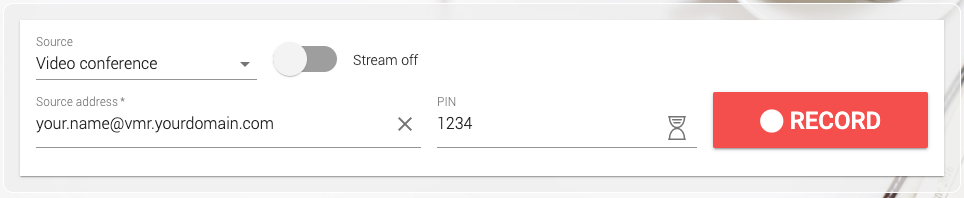
REC.VC dials out to the Pexip VMR and captures video and audio, and any content shared during the meeting.
3. Automatic recording of Pexip meetings
A VMR on both Pexip as-a-Service and Pexip Infinity can be configured to automatically connect your REC.VC recorder so that your meetings are always recorded, e.g. for compliance (financial sector) or simply for ease-of-recording purposes.
Automatic recording of Pexip VMRs can be configured by a Pexip administrator by using the Autodial feature available under Advanced settings of the VMR in question. Both SIP and RTMP based recording is supported when using this feature.

4. Managing and sharing your recorded Pexip meetings
The real fun starts when you have made the recording and you are ready to share and manage it. Here is a video tutorial on how to use REC.VC to manage and share your recorded Pexip meetings:
Posted in Recording Tagged with: pexip, recording, RTMP, sip
April 10th, 2020 by admin
We are excited to share with you that the Cisco Meeting Server (CMS) from version 2.9 natively supports third-party SIP recording service like REC.VC.
CMS customers have used REC.VC to record and live stream video meetings for years, simply by establishing a SIP session between the CMS room and REC.VC (by calling either way). The big change with CMS version 2.9 is that CMS + REC.VC customers can leverage the native recording button available in the various interfaces used by CMS users.
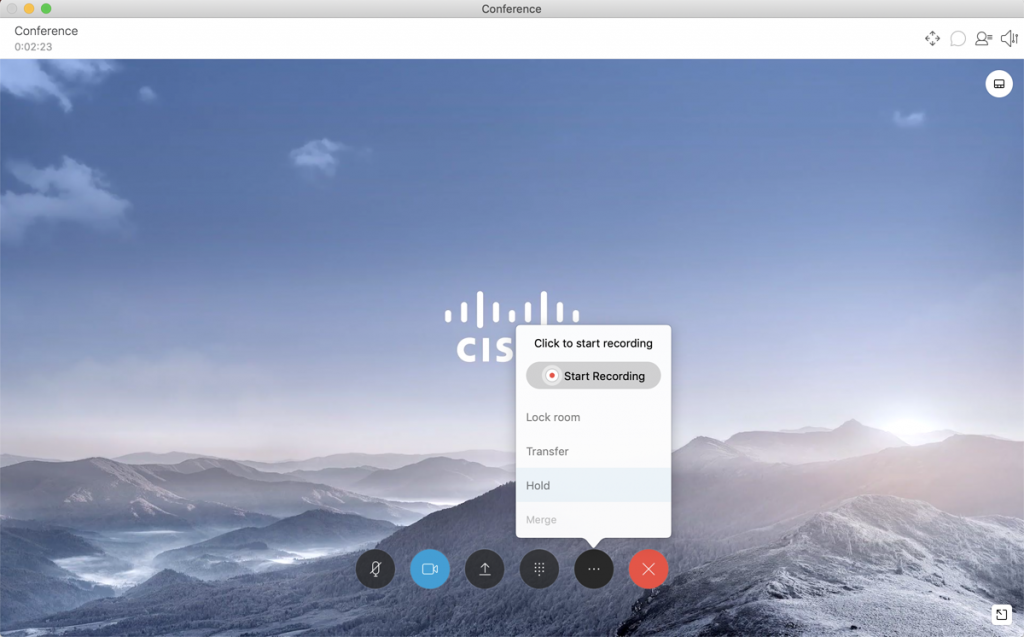 Cisco Jabber with Start Recording buton
Cisco has shared the following details in the release notes published on April 8, 2020:
From 2.9, the Meeting Server allows configuration of an external third-party SIP recorder so that when recording is started an administrator-configured SIP URI is called instead of using the Meeting Server internal recorder component.
Note: Support for an external third-party SIP recorder still requires Meeting Server recording licenses.
The new SIP recorder feature:
- allows recorders to negotiate BFCP in order to receive separate video and content streams. This gives more flexible options for how recordings are formatted.
- supports the same resolutions as we do for standard SIP calls
- supports the same audio and video codecs as standard SIP calls
- as with the existing Meeting Server internal recorder, any media content sent by the SIP recorder is discarded
Note: The SIP recorder feature does not support TIP or Active Control.
Specifying the SIP recorder A new API parameter for /callProfile objects is introduced to specify the SIP recorder. It supports GET, PUT and POST and is defined as follows:
- sipRecorderUri — If set, this URI is used to dial out to when recording is enabled. If unset, the Meeting Server recorder component (if configured in /recorders) is used.
Starting / stopping the recording The same start / stop methods supported by the Meeting Server recorder component can be used to initiate a SIP recorder. Which recorder is used depends upon whether you have configured the API parameter sipRecorderUri. The methods currently supported are:
- With the callProfile recordingMode set to automatic, recording starts when users join. Users cannot start / stop the recording.
- When recordingMode is set to manual, users can start / stop recording using a dtmfProfile, Active Control, Meeting App or via an API PUT/POST on calls.
Finding out recording status The same methods supported by the Meeting Server recorder component can be used to find out the SIP recorder status, for example, GET on callLegs/ — the recording value in the status output found here indicates whether this callLeg is recording (true) or not (false).
New to REC.VC? Sign up for a free trial today!
Posted in Uncategorized Tagged with: cisco, cisco meeting server, cms, recording
March 30th, 2020 by admin
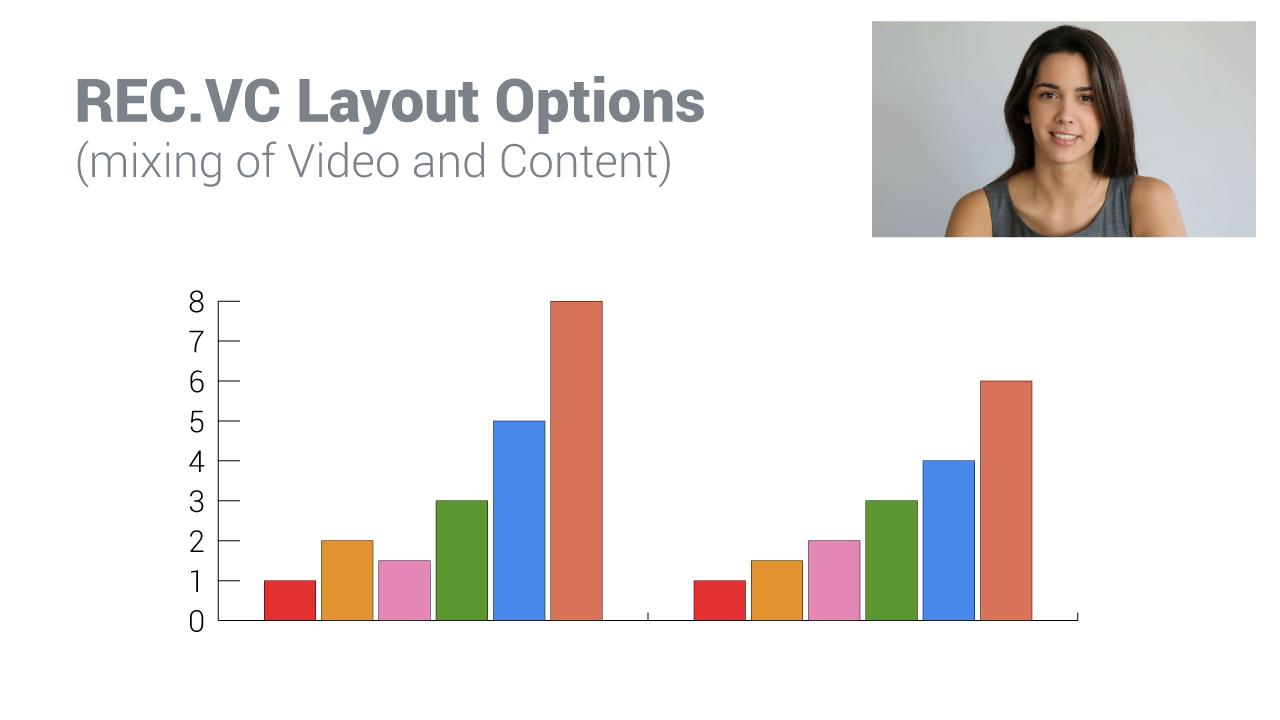
You have two alternatives for where mixing of video and content take place when using REC.VC to record or live stream (REC.VC hosted or on Facebook, Workplace or YouTube) a video meeting:
- Mixing on the videoconference platform or service (e.g. by Cisco collaboration platform/service (Webex Events, Webex Meetings, Webex Teams, Cisco Meeting Server (CMS)), or Pexip (Cloud or Infinity)).
- Mixing on REC.VC side based on two streams from the remote side.
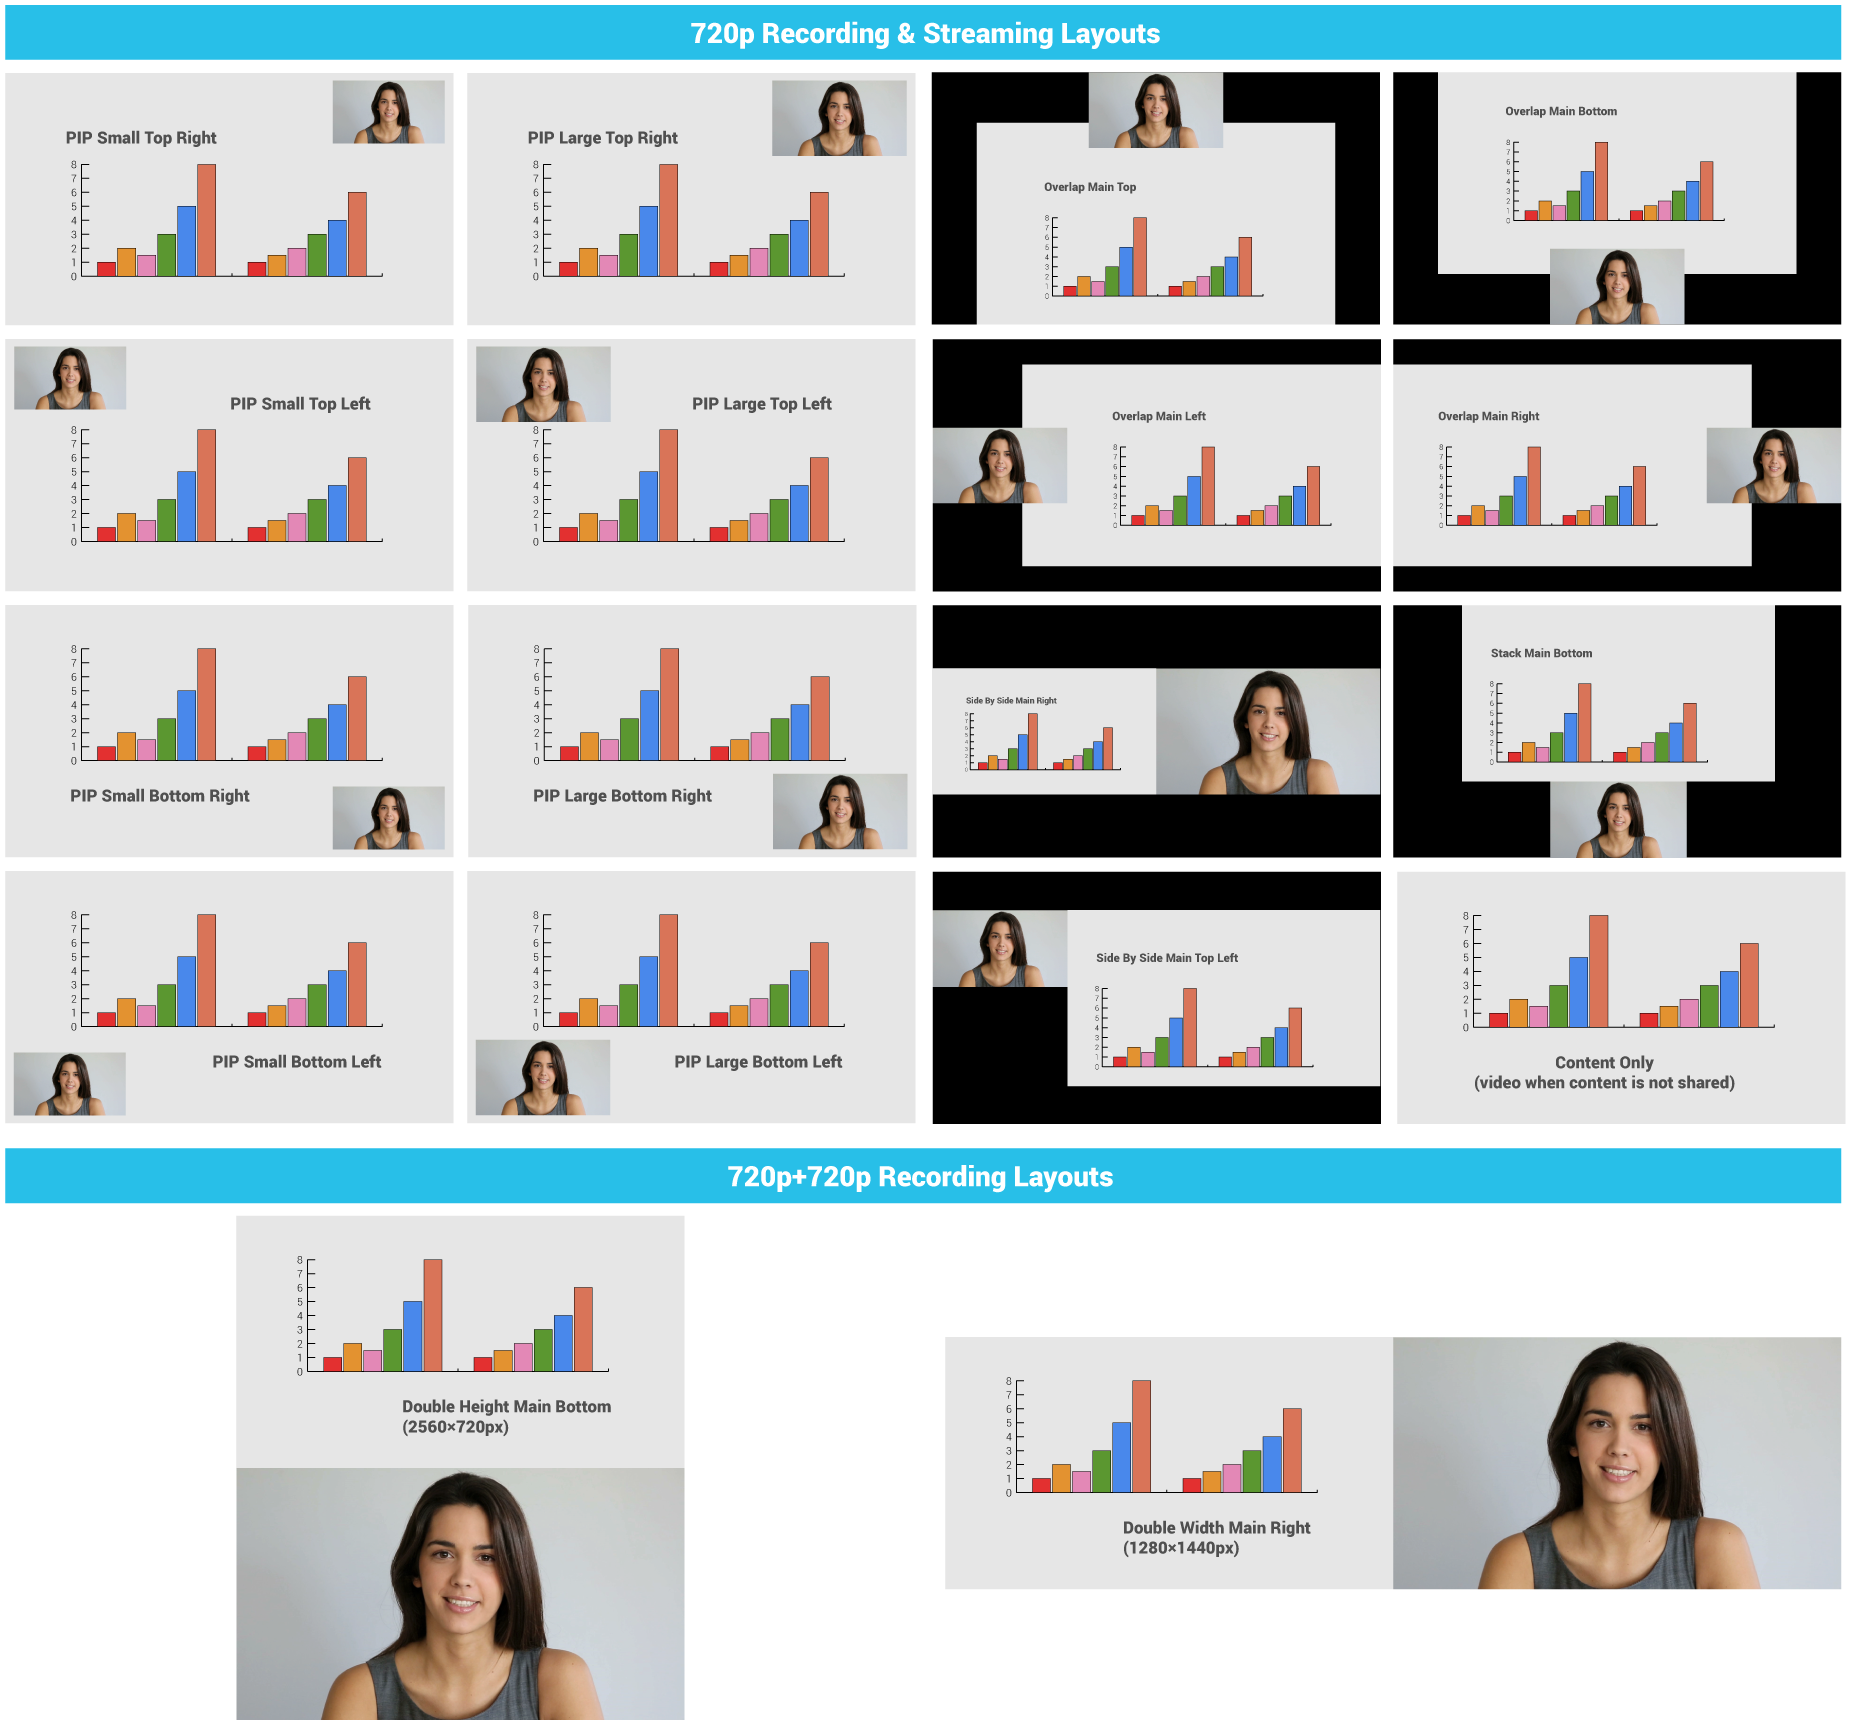
REC.VC offers 18 layouts when mixing takes place on REC.VC side:
- 16 layouts for regular 720p (1280×720) recording & streaming
- 2 layouts for special 720p x 2 recording for maximum quality
How to enable or change a layout?
A REC.VC Admin Users can change the layout for a user within own organization:
- Go to the edit interface of the Recorder in question
- Enable BFCP* (if not already enabled)
- Select layout from the Video Layout dropdown
If you do not have admin permission, please contact your REC.VC Admin User or email support@rec.vc to request a Video Layout for your account.
* Technical: When BFCP is enabled, REC.VC will receive two streams from the remote side (content + people) and mix according to the selected Video Layout. For customers on the rec.vc domain, or for customers with Recorders registered to own VCS, the VCS will do the interworking between H.239 (H.323) and BFCP (SIP).
New to REC.VC? Sign up for a free trial today!
Posted in Uncategorized Tagged with: cisco webex, live streaming, pexip, recording, video layout
September 9th, 2019 by admin
We have just released the REC.VC Recorder Bot for Cisco Webex Teams making it even easier to record & share video meetings within any Space in Webex Teams.
The Recorder Bot can be added to any Space in Webex Teams and users can easily record video meetings and automatically get recording playback links posted back to and shared with all members of the Teams Space.
To use the Recorder Bot, you need an active REC.VC account and an active Webex Teams account with the same email address used in both applications.
Here is how to get started in Webex Teams:
- Add the Recorder Bot (rec@webex.bot) to any Space as a member
- Enter @Recorder help for instructions/menu on how to use the Recorder Bot
- Any user with a REC.VC account (with matching email address) can use @Recorder to Start, Pause, Resume, and Stop recording sessions.
- The playback link is posted to all Space members when starting the recording.
New to REC.VC? Sign up for a free 14-day trial today!
The Recorder Bot is also listed on the Cisco Webex App Hub.
Posted in How to, New features, Recording Tagged with: cisco, recording, webex teams
We invite existing resellers and customers to test the soon to be released REC.VC RTMP Recording feature enabling capture from any RTMP source including:
- Pexip (as an alternative to SIP)
- Video/audio mixers
- IP cameras
REC.VC RTMP recording will capture any quality received, so if you send 720p, 1080p or 4K, it will be recorded and stored in the original quality.
To test the REC.VC RTMP Recording feature in Private Beta, please email support@rec.vc with your recorder SIP URI to receive information on how to use the RTMP recording feature.
New to REC.VC? Sign up for a free trial and we’ll notify you when we move to public beta.
We appreciate your help in testing this new feature!
Posted in New features, Recording Tagged with: pexip, recording, RTMP

November 1st, 2018 by admin
Did you know that you with REC.VC can chose between 18 predefined recording layouts for when you record a videoconference meeting? The layouts are different ways to mix the video and the content presented in the meeting.
You may watch the demo below (posted on LinkedIn) or experience the REC.VC native playback experience of the same video clip.
Posted in How to, Recording Tagged with: recording, video conference, video conference recording
February 1st, 2018 by admin
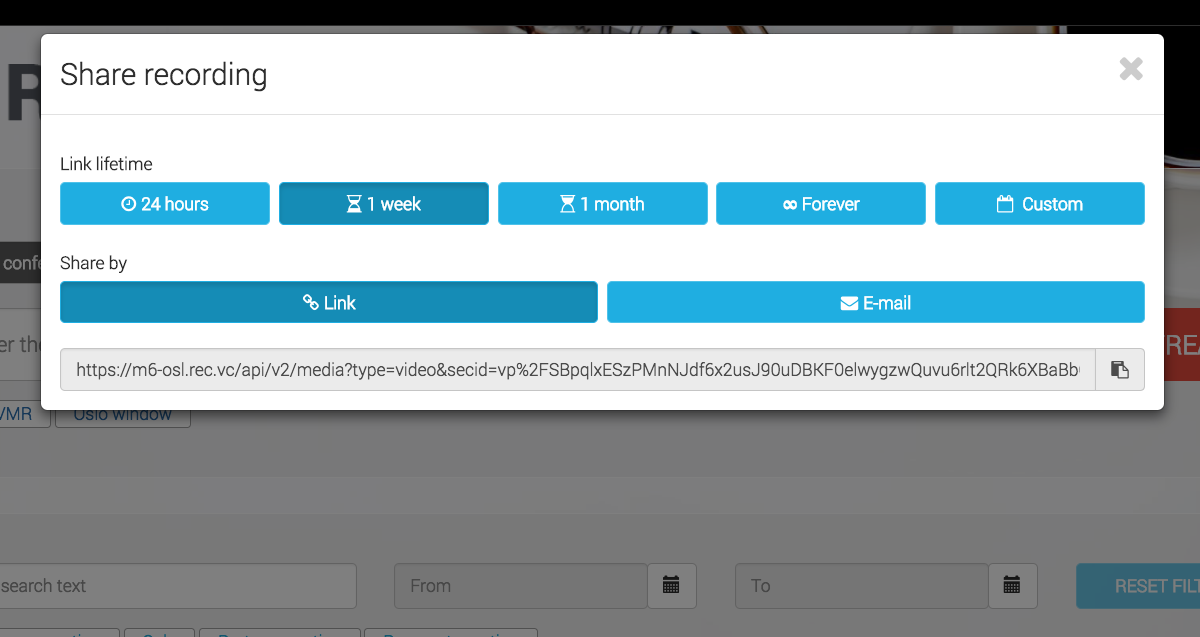
Today we updated REC.VC with a new security feature enabling you to set the Link Lifetime when sharing your recorded videos with third-parties.
The new feature gives you the following Link Lifetime options when creating links:
- 24 hours
- 1 week
- 1 month
- Forever
- Custom (select expiry date)
You can with the new sharing feature create unlimited numbers of playback links for a video with unique Link Lifetime (e.g. for different audiences).
When creating a new playback link you can easily copy & paste it from the user interface, or share it by email (triggering an email from REC.VC).
Any playback link that you have shared prior to February 1st, 2018, will continue to work for at least two months. We recommend however that you by April 1st 2018 generate and share new links for any of your old recordings that you want external parties to have access to. We do not guarantee that old playback links will work after April 1st 2018.
Posted in New features, Security Tagged with: lifetime, link, playback, recording
September 1st, 2017 by admin
 Lead generation is, of course, important for any business with growth aspiration. Your video conference business may be using a number of techniques to attract and nurture leads including content marketing, email marketing, search marketing, social marketing, and more.
One key challenge is to increase the lead to prospect ratio. In other words, you want to get more of the people that have at some point in the past shown an interest in your company in one way or another, to actually evaluate and potentially buy your products and services.
As a video conference business, you probably have multiple mechanisms in place to convert leads to prospects, including quote forms and trial of your virtual meeting room (VMR) service and endpoint registration and calling service.
The REC.VC White Label Edition for video conferencing resellers and service providers not only complements your existing portfolio of video conferencing products and services, it also adds to your existing lead to prospect conversion activities as it includes complete free trial functionality.
The white label edition includes the following:
- 1 white label site and domain (see yourbrand.rec.vc for details)
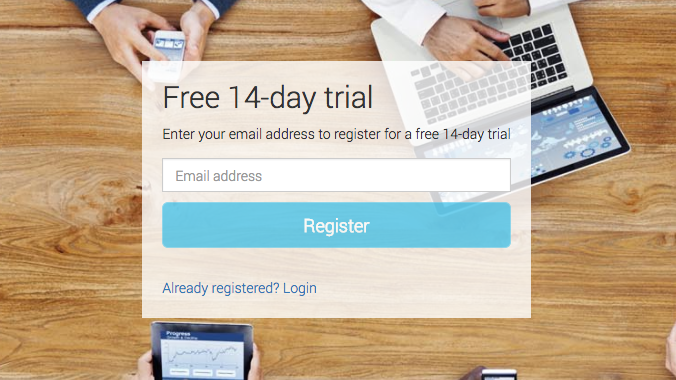
- Unlimited number of 14-day free trial accounts
- REC.VC Base Group 10 and Live Streaming 100 Subscriptions for your internal/demo use
- 100% hosted by REC.VC (customers select between US, EU or hosting in Norway)
The trial process work as follows:
- Person registers via your REC.VC white label site
- Person receives an activation link by email which automatically creates the trial account
- You’ll receive email notification for each sign-up and can follow their trial activities via the admin interface.
- Person’s trial account is automatically disabled after 14 days. The person will still be able to access his/her account to share and download recordings, but will not be able to start any new recording or streaming sessions.
To learn more about how your video conference business can leverage the REC.VC White Label Edition, please contact sales@rec.vc. You can also sign-up for your own trial account via my.rec.vc.
Posted in Channel, white label Tagged with: free trial, lead, prospect, recording, streaming, video conference